
 MixMagnify
Welcome to MixMagnify
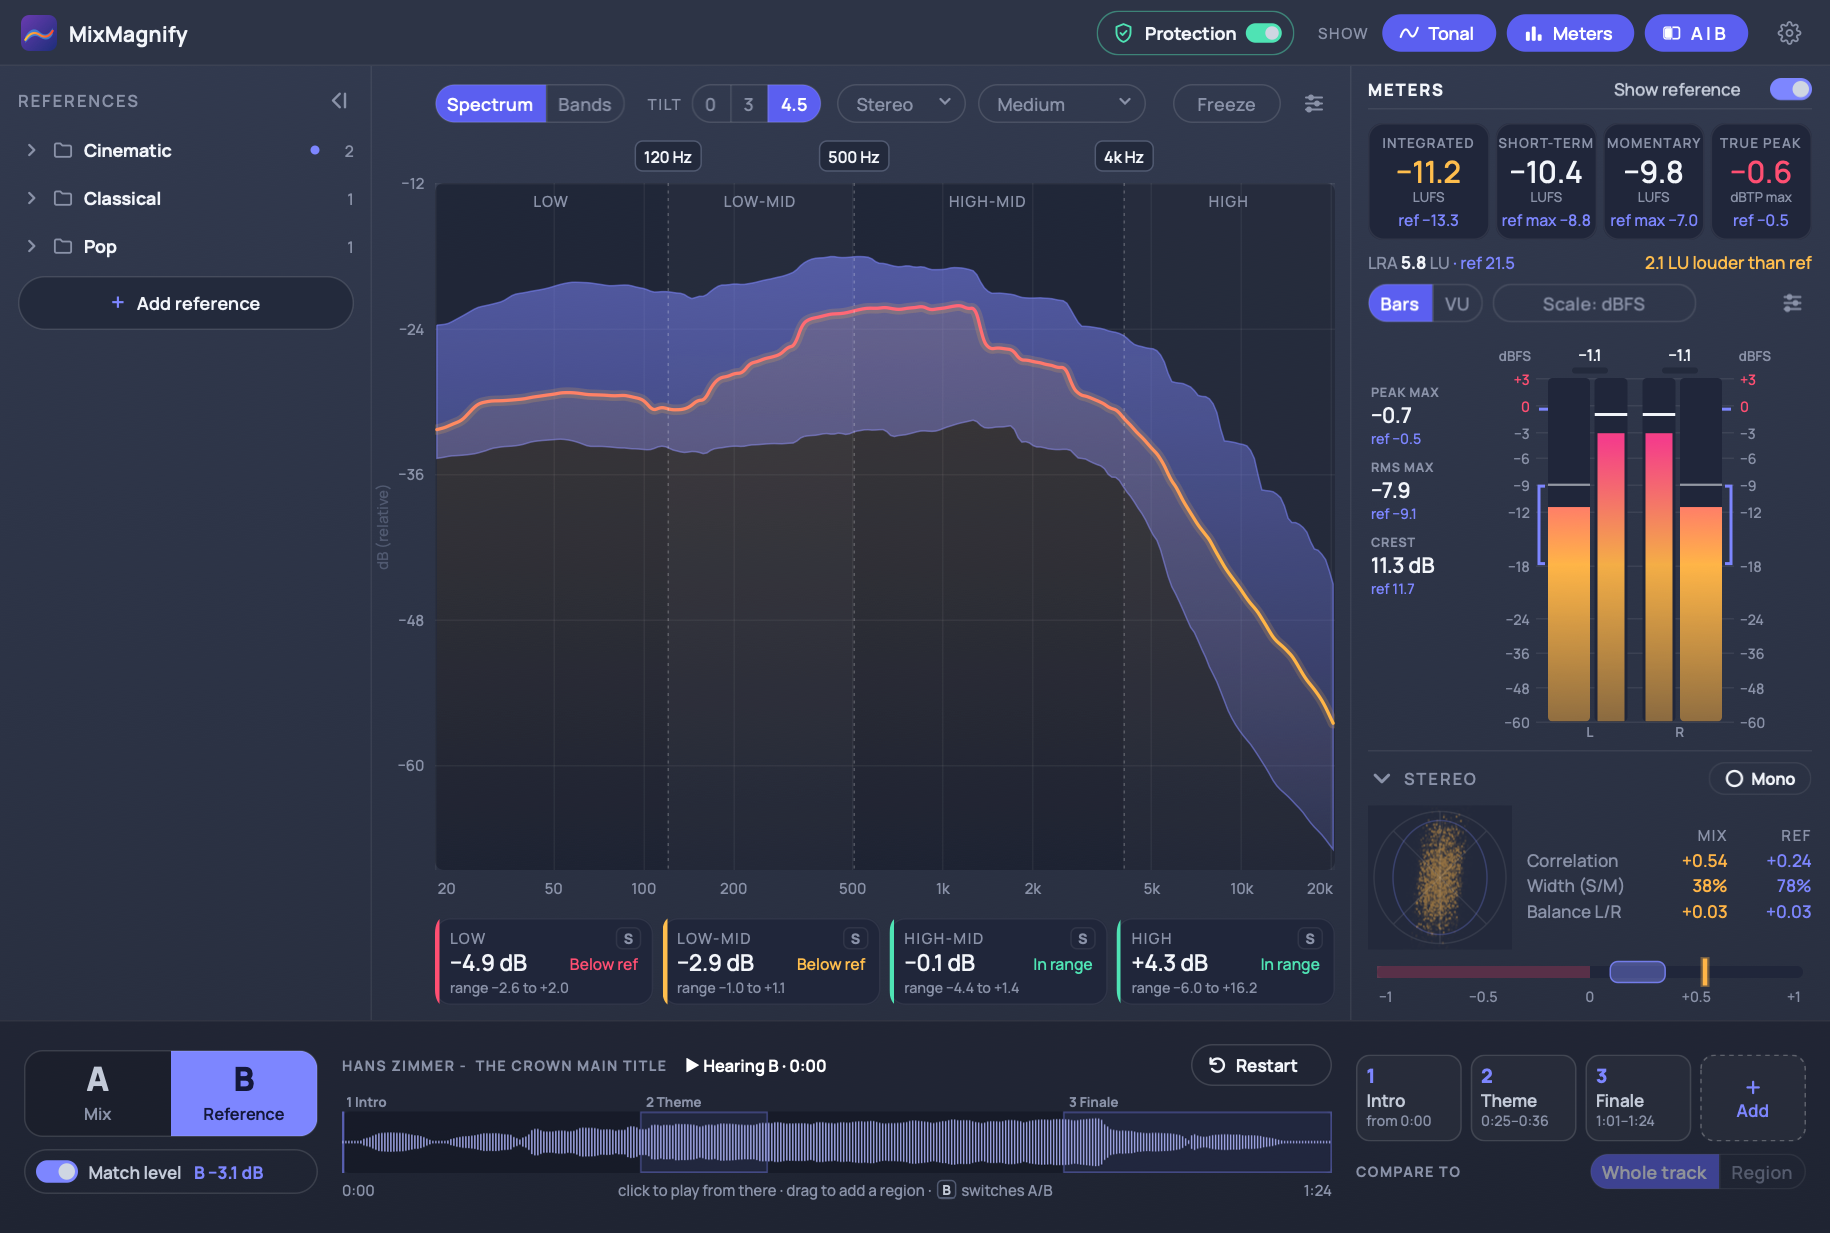
MixMagnify compares your mix with reference tracks that you trust. It shows how your tonal balance, loudness and stereo image line up against the reference, and lets you switch between your mix and the reference without leaving your session. It also includes audio spike and overload protection to pre-emptively catch any sudden loud bursts in your session.
MixMagnify comes in two parts that share one reference library:
- The MixMagnify plugin (AU and VST3), which you put on your main output to compare your mix with a reference while you work.
- The MixMagnify app, a standalone app for building your reference library: add audio files, organize them into folders, and capture tracks while they play in a music or streaming app.
Every reference you add, in the plugin or the app, is analyzed once and saved to your library. It then shows up automatically in every open plugin window and in the app.
We'll cover each part of the plugin first, and then the app.
For accurate readings, put MixMagnify last on your main output, after any limiter. It measures what reaches it, so anything after it isn't measured.
Installation
Run the MixMagnify installer and follow the steps. You can choose which parts to install (the AU plugin, the VST3 plugin and the app) and whether to install them for all users (the default) or just for you. If your DAW was open, restart it or refresh its plugin list so it finds MixMagnify.
Activation and the trial
MixMagnify runs as a free trial for 7 days. The trial is fully featured, with two limits:
- Sessions last 20 minutes. When a session ends, MixMagnify passes your audio through untouched, with Overload Protection off, and asks for a license key. Reopen the plugin or the project (or quit and reopen the app) to start another session.
- 3 references in total. The trial lets you add up to 3 references, counted across the plugin and the app. Deleting a reference doesn't reset the count.
To activate, click Activate in the dialog, paste your license key and click Activate again. One license covers the AU, the VST3 and the app on your computer. Click Trial to keep trying MixMagnify instead.
When the trial ends, MixMagnify keeps passing audio through untouched so your session still plays, but it shows only the Activate dialog until you enter a valid license key.
If you see "Key Error: The entered key is not valid", check that you pasted the whole key, with nothing missing at either end.
First-run tour
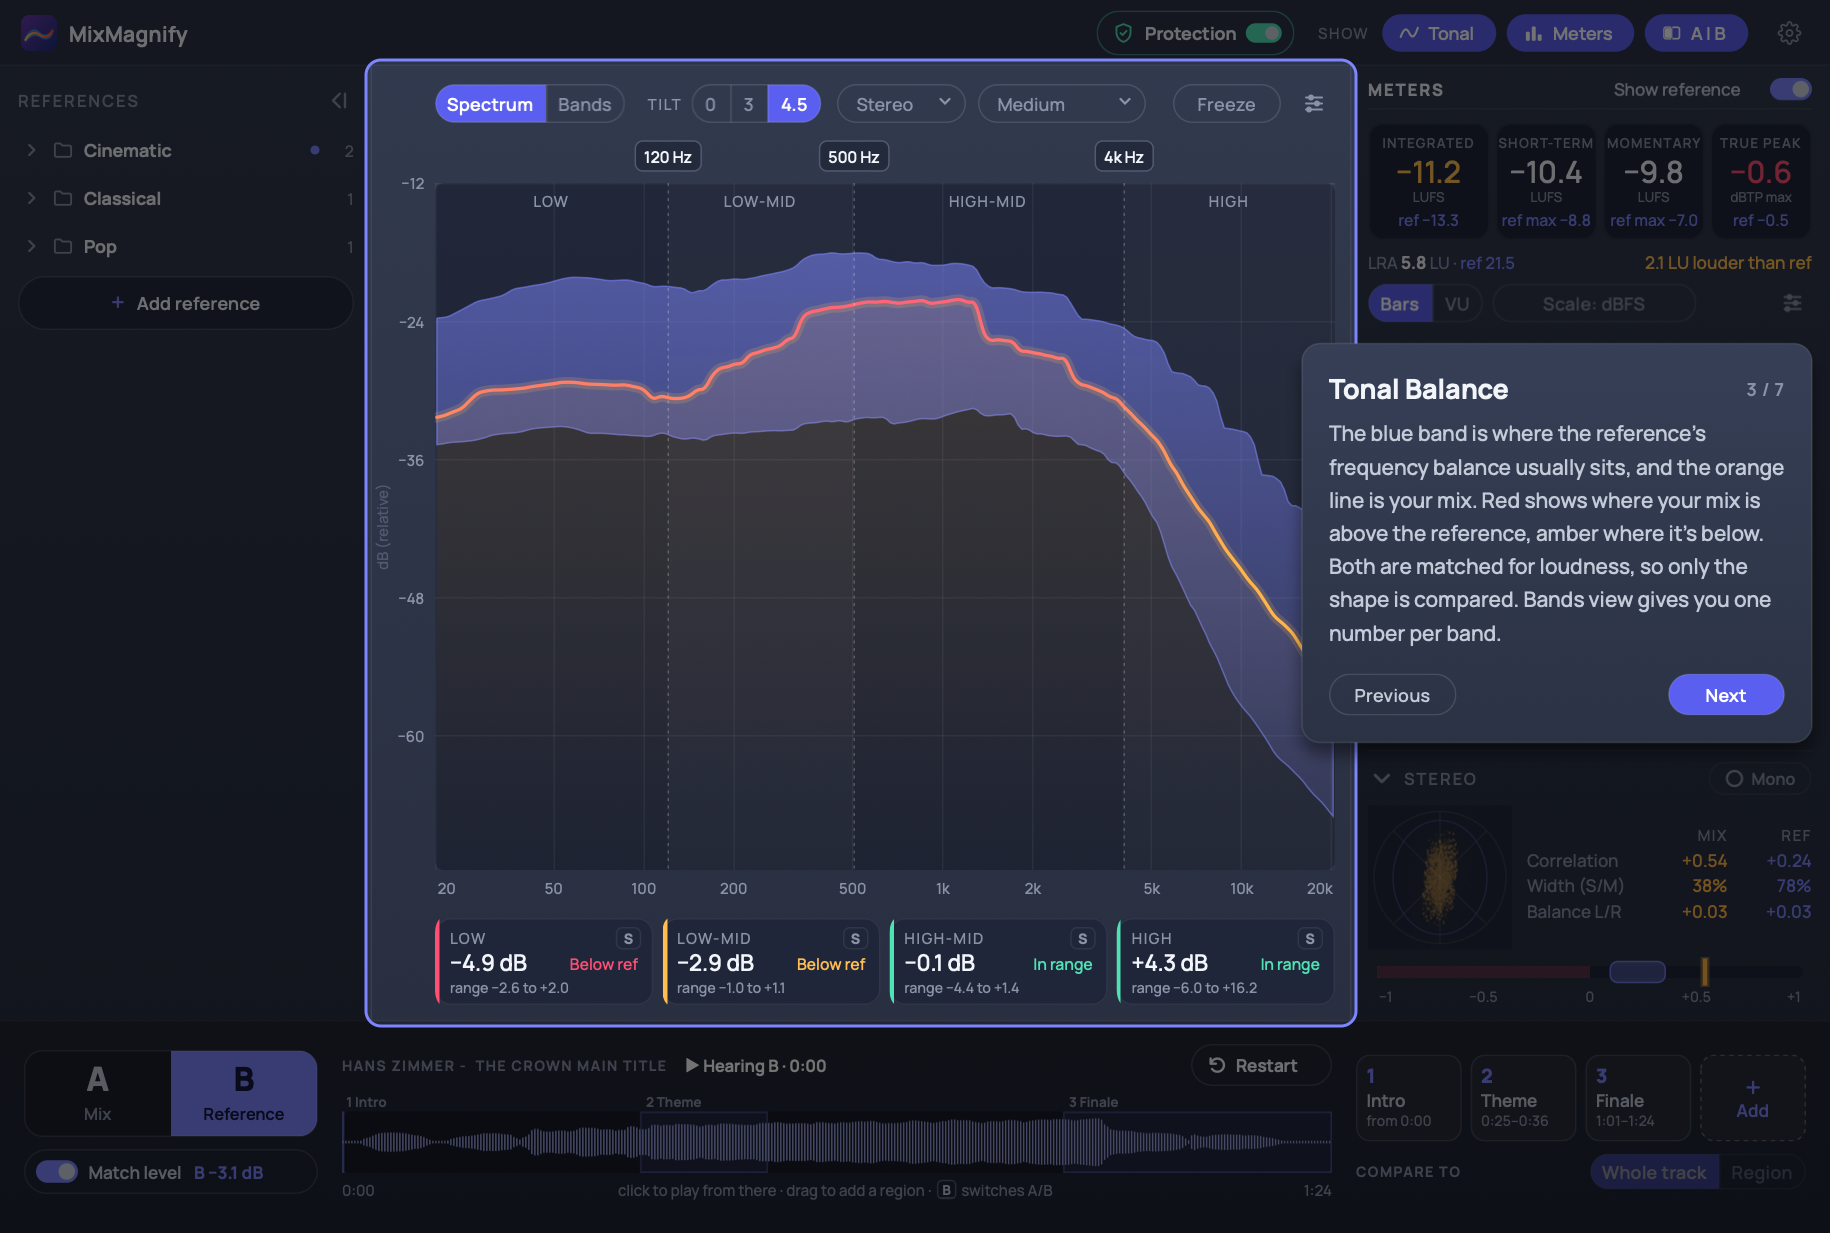
The first time you open MixMagnify, a short tour shows you around: your references, the Tonal view, the meters, A/B listening, Overload Protection, and where to add your first reference. Click Next and Previous to move through it, or Skip tour to close it. The tour shows once per computer. While it runs, the Tonal view, meters and AB listen bar show example data, so you can see what they look like before you've added a reference.
Layout
The plugin window has five areas. We'll cover each one in more detail below.
- Toolbar (top): Overload Protection, the Show buttons and Settings.
- References (left): your reference library. Click a reference to compare against it.
- Tonal (middle): your mix's frequency balance against the reference.
- Meters (right): loudness, true peak, levels and stereo image, with the reference's values as comparison.
- Listen bar (bottom): switch between your mix (A) and the reference (B), and mark sections of the reference to compare against.
Quick start
- Put MixMagnify last on your main output.
- Drop a track you like on the References panel (or click Add reference). MixMagnify analyzes it in a few seconds and saves it to your library.
- Click the reference to make it active.
- Play your mix. Its curve builds in the Tonal view and the meters start reading.
- Press B (or click the A/B switch) to hear the reference, matched to your mix's loudness. Press it again to go back to your mix.
The Toolbar
Overload Protection
The Protection pill turns Overload Protection on and off, and shows when it has tripped. See Overload Protection below.
Show
The Show buttons show or hide the Tonal view, the Meters and the A | B listen bar. The window shrinks to fit what's left. With the listen bar hidden, a small A/B switch appears in the toolbar so you can still compare. The References panel collapses separately (see below).
Mono and Solo badges
When Mono or Band Solo is on, a MONO or SOLO badge appears in the toolbar, so you don't forget you're not hearing the full stereo mix. Click the Mono or Solo badge to hear everything again.
Settings
The cog at the top right opens Settings. See Settings below.
Window size
Drag the window's corner to resize it, from 75% to 200% of its normal size, or choose a size under Settings > Display > Window size. The window keeps its shape as it scales.
Your Reference Library
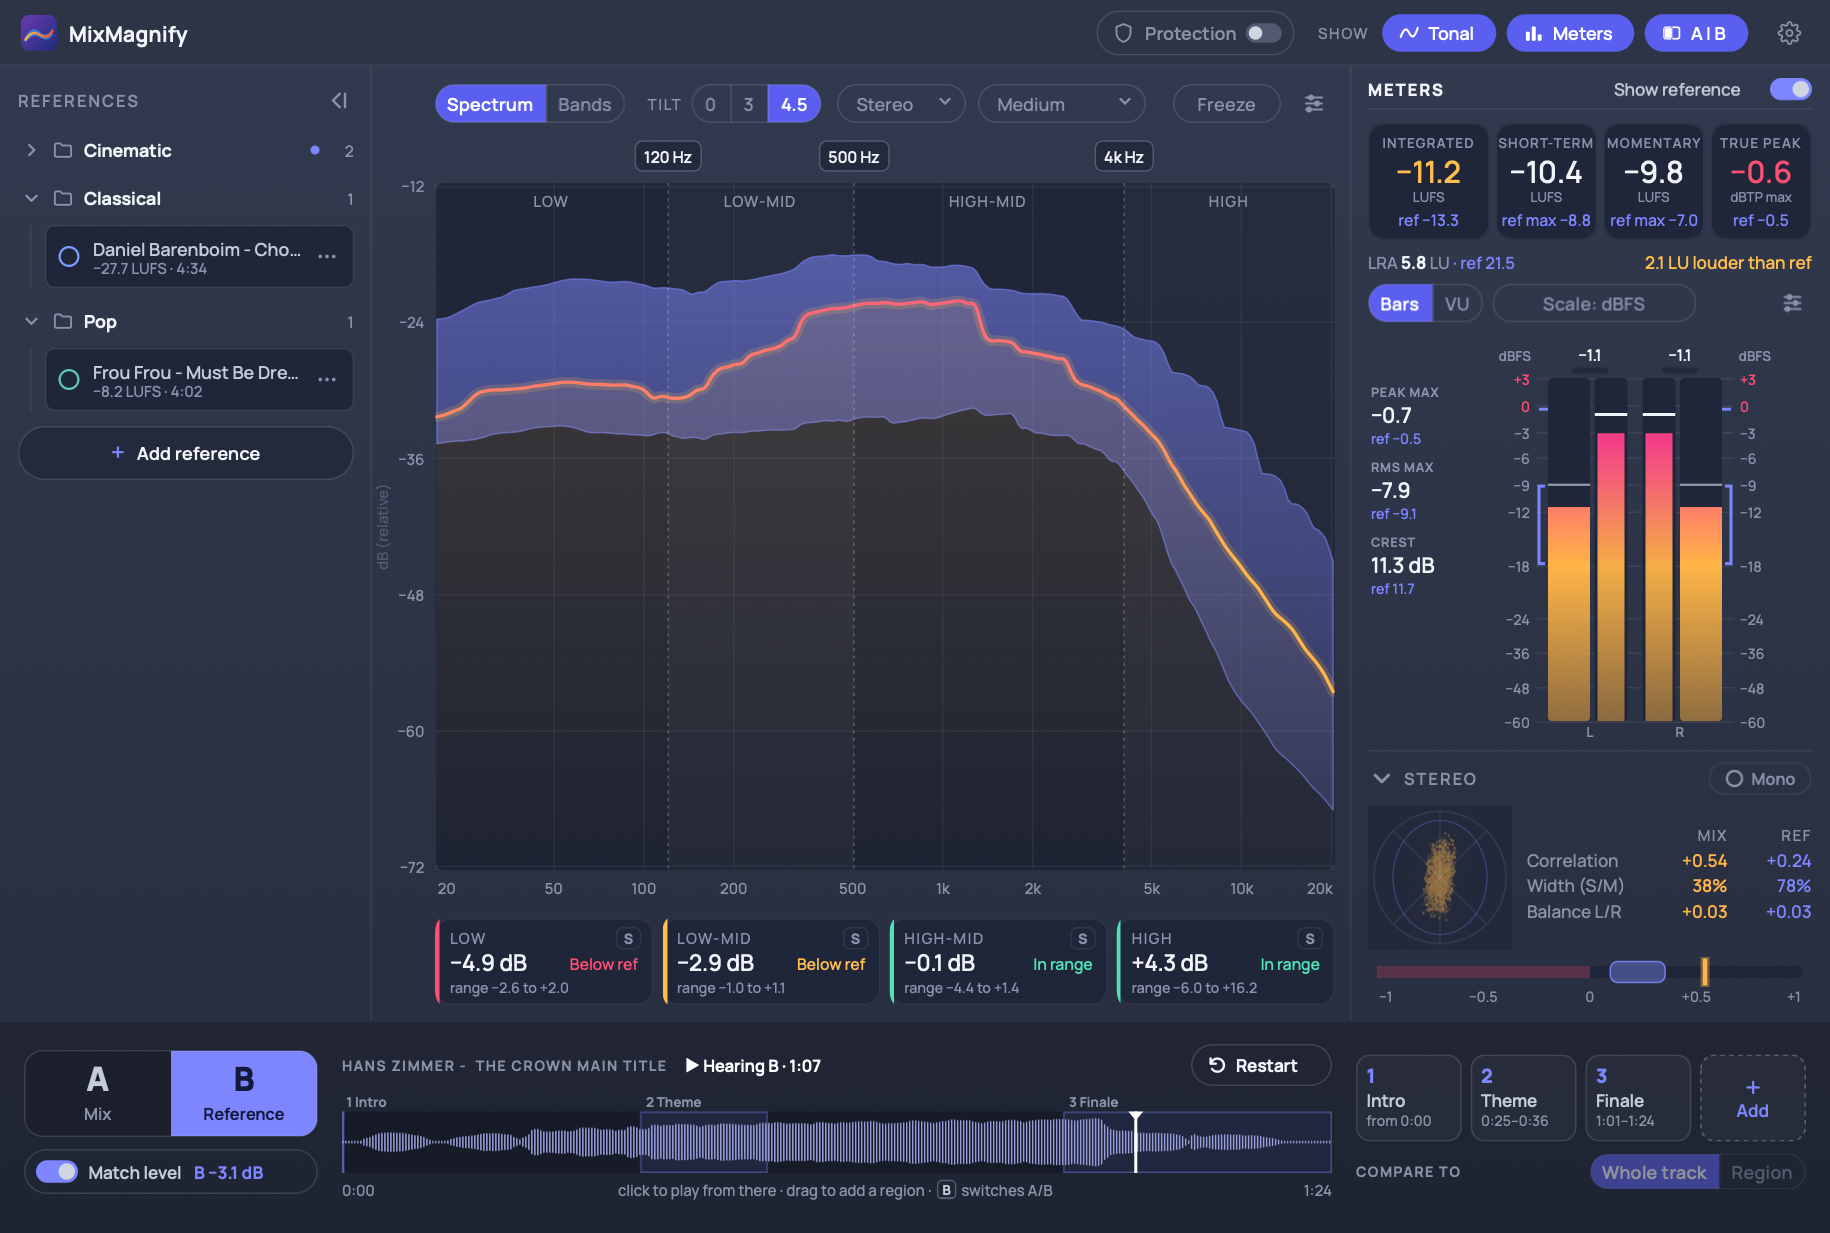
The References panel on the left lists every reference in your library. Click one to make it the active reference: the Tonal view, the meters and the listen bar all compare against it. Each plugin instance remembers its own active reference when you save your project.
Click the arrow at the top of the panel to collapse it to a narrow rail of colored dots, which gives the Tonal view more room. Click a dot to switch reference.
Add a reference
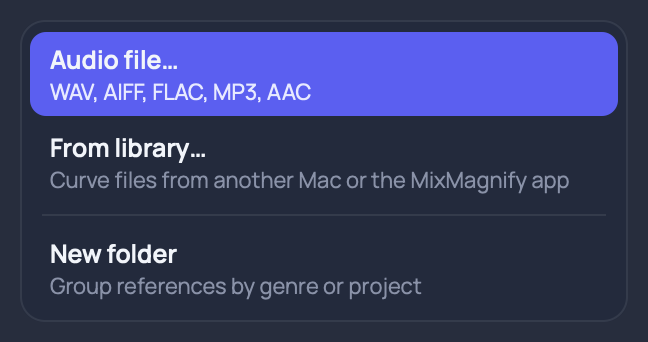
Drop an audio file on the panel, or click Add reference at the bottom and choose:
- Audio file… to pick a WAV, AIFF, FLAC, MP3 or AAC file.
- From library… to import curve files from another computer or from the MixMagnify app.
- New folder to make a folder.
New Reference
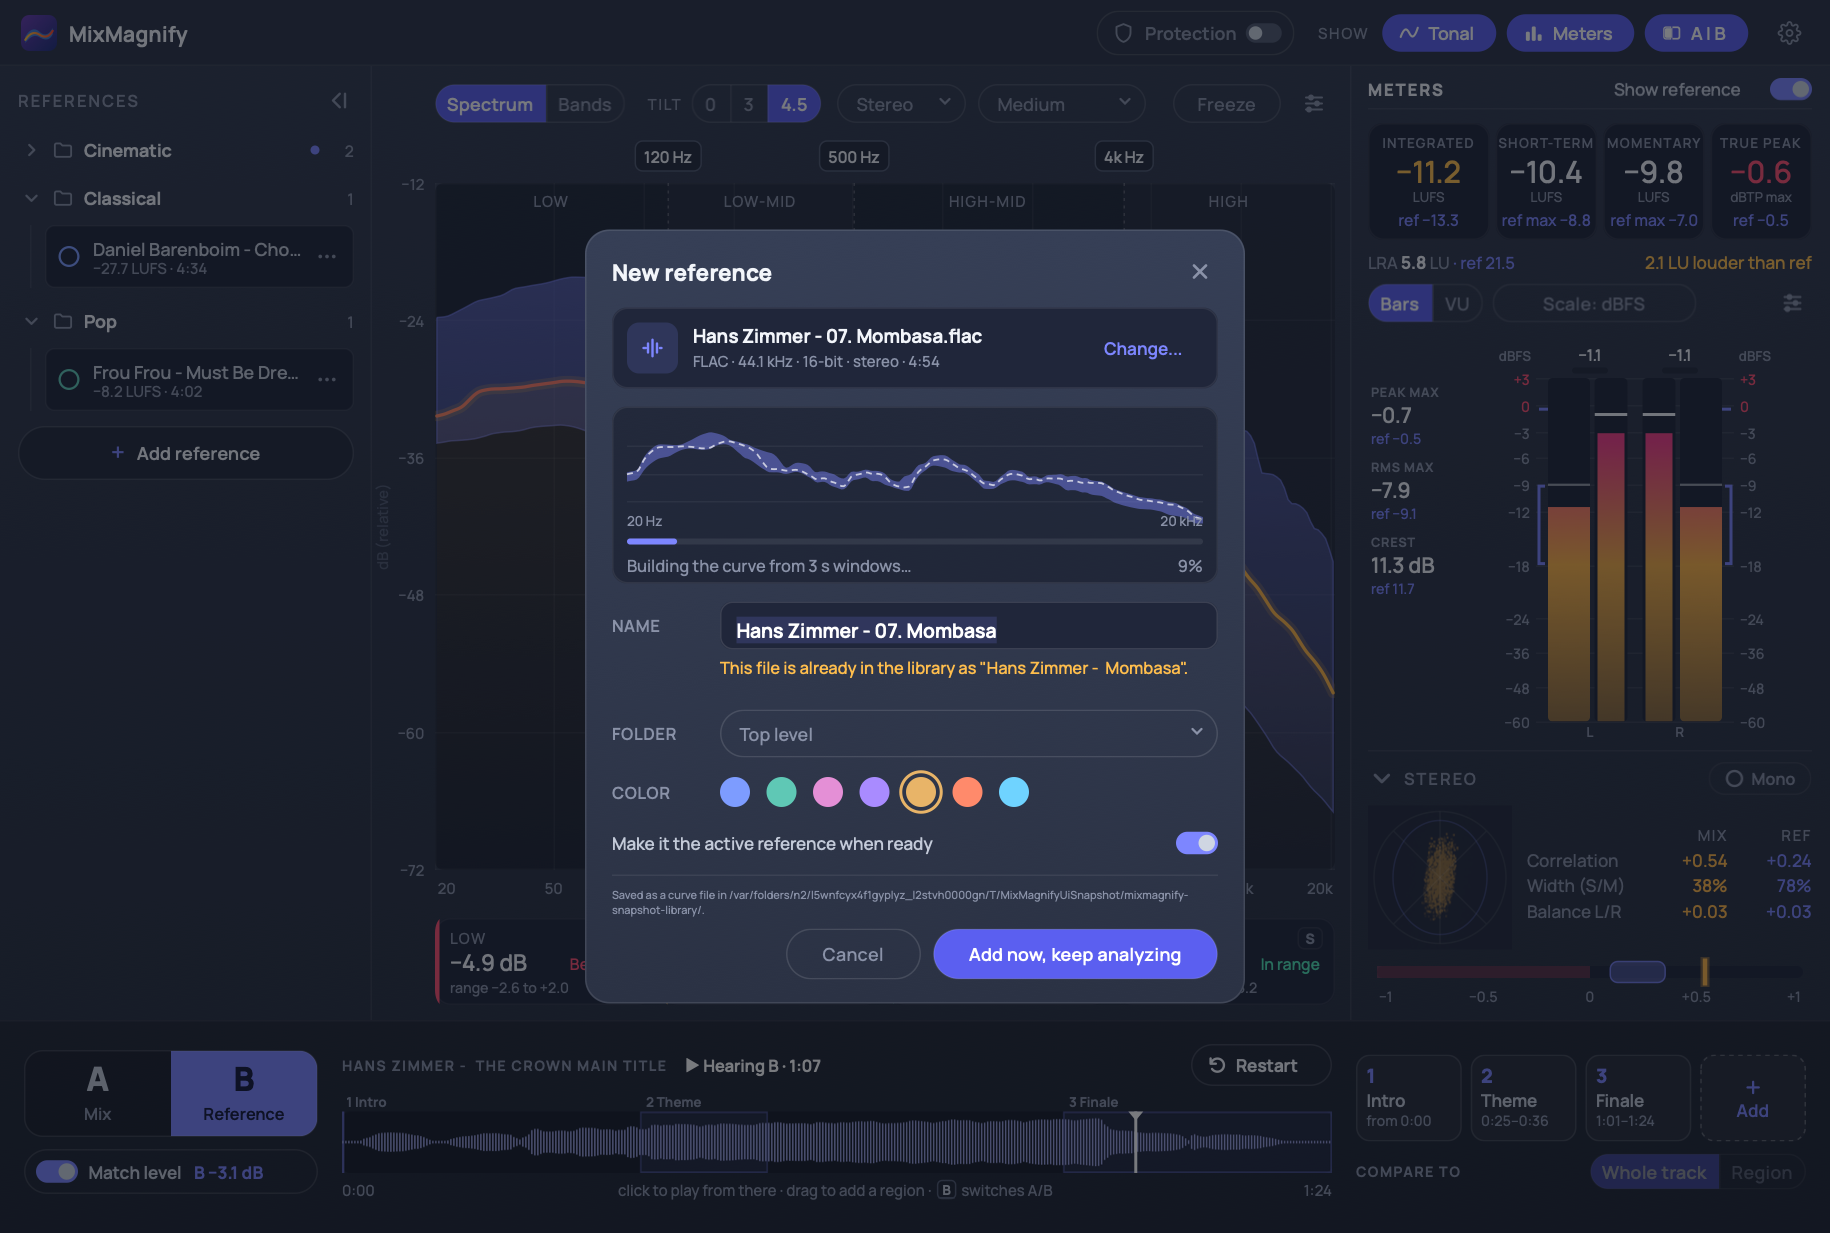
When you add an audio file, a New reference dialog opens and the analysis starts straight away. You'll see the curve build as the file is decoded and measured, usually in a few seconds. While it runs, you can:
- Name the reference. A default name is filled in from the file's tags or its file name.
- Choose a Folder, or make a new one.
- Pick a Color for its dot in the list.
Click Add reference when it's done, or Add now, keep analyzing to close the dialog and let it finish in the background. The reference shows as Analyzing… in the Reference list until it's ready.
A reference has to be at least 10 seconds long.
MixMagnify doesn't copy your audio file into the library. It remembers where the file is so A/B listening can play it. If you move or rename the file, the curve still works, but the AB listen bar asks you to Locate file… before it can play it.
Folders
Use folders to group references by genre, loudness, artist, project, or anything else. Folders are closed by default: click a folder to open or close it. Drag a reference onto a folder to move it there, or use Move to folder in its menu.
The reference menu
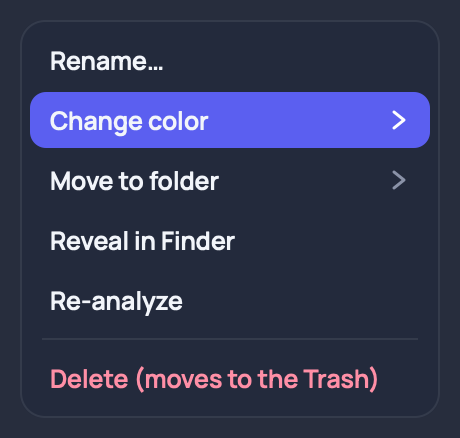
Hover over a reference and click ⋯ (or right-click it) for:
- Rename…
- Change color
- Move to folder
- Re-analyze, which measures the original audio file again. It needs the file to still be where it was.
- Reveal, which shows the curve file in your file browser.
- Delete, which moves the curve file to the Trash. It doesn't touch your audio file.
One library everywhere
The plugin (AU and VST3) and the app share one library folder. A reference added, renamed, moved or deleted in one shows up in the others within a couple of seconds. You can change the library folder in Settings, and copy the folder to another computer to move your references.
The Tonal View
The Tonal view compares your mix's frequency balance with the reference's. Both are measured the same way and each is matched to its own loudness. A louder or quieter mix therefore doesn't affect its curve - only the shape is compared. That's why the vertical axis reads "dB (relative)".
Reading the curves
- Reference band (blue area): where the reference's frequency balance sits most of the time
- Reference median (dashed blue line): the reference's typical balance. Turn it on in the Options menu with Show reference median.
- Mix curve (orange line): your mix, averaged over the time set by Response.
- Mix range (faint orange area): how much your mix has been varying recently. Turn it on with Show mix range.
- Delta area: red where your mix is above the reference band, amber where it's below. Turn it off with Show delta area.
If your mix stays inside the blue band, its balance is in the same territory as the reference. A wide red patch around 200 Hz, for example, means your low mids are heavier than the reference ever gets. An amber patch at 10 KHz would mean your upper frequencies are lacking compared to the reference.
Spectrum and Bands
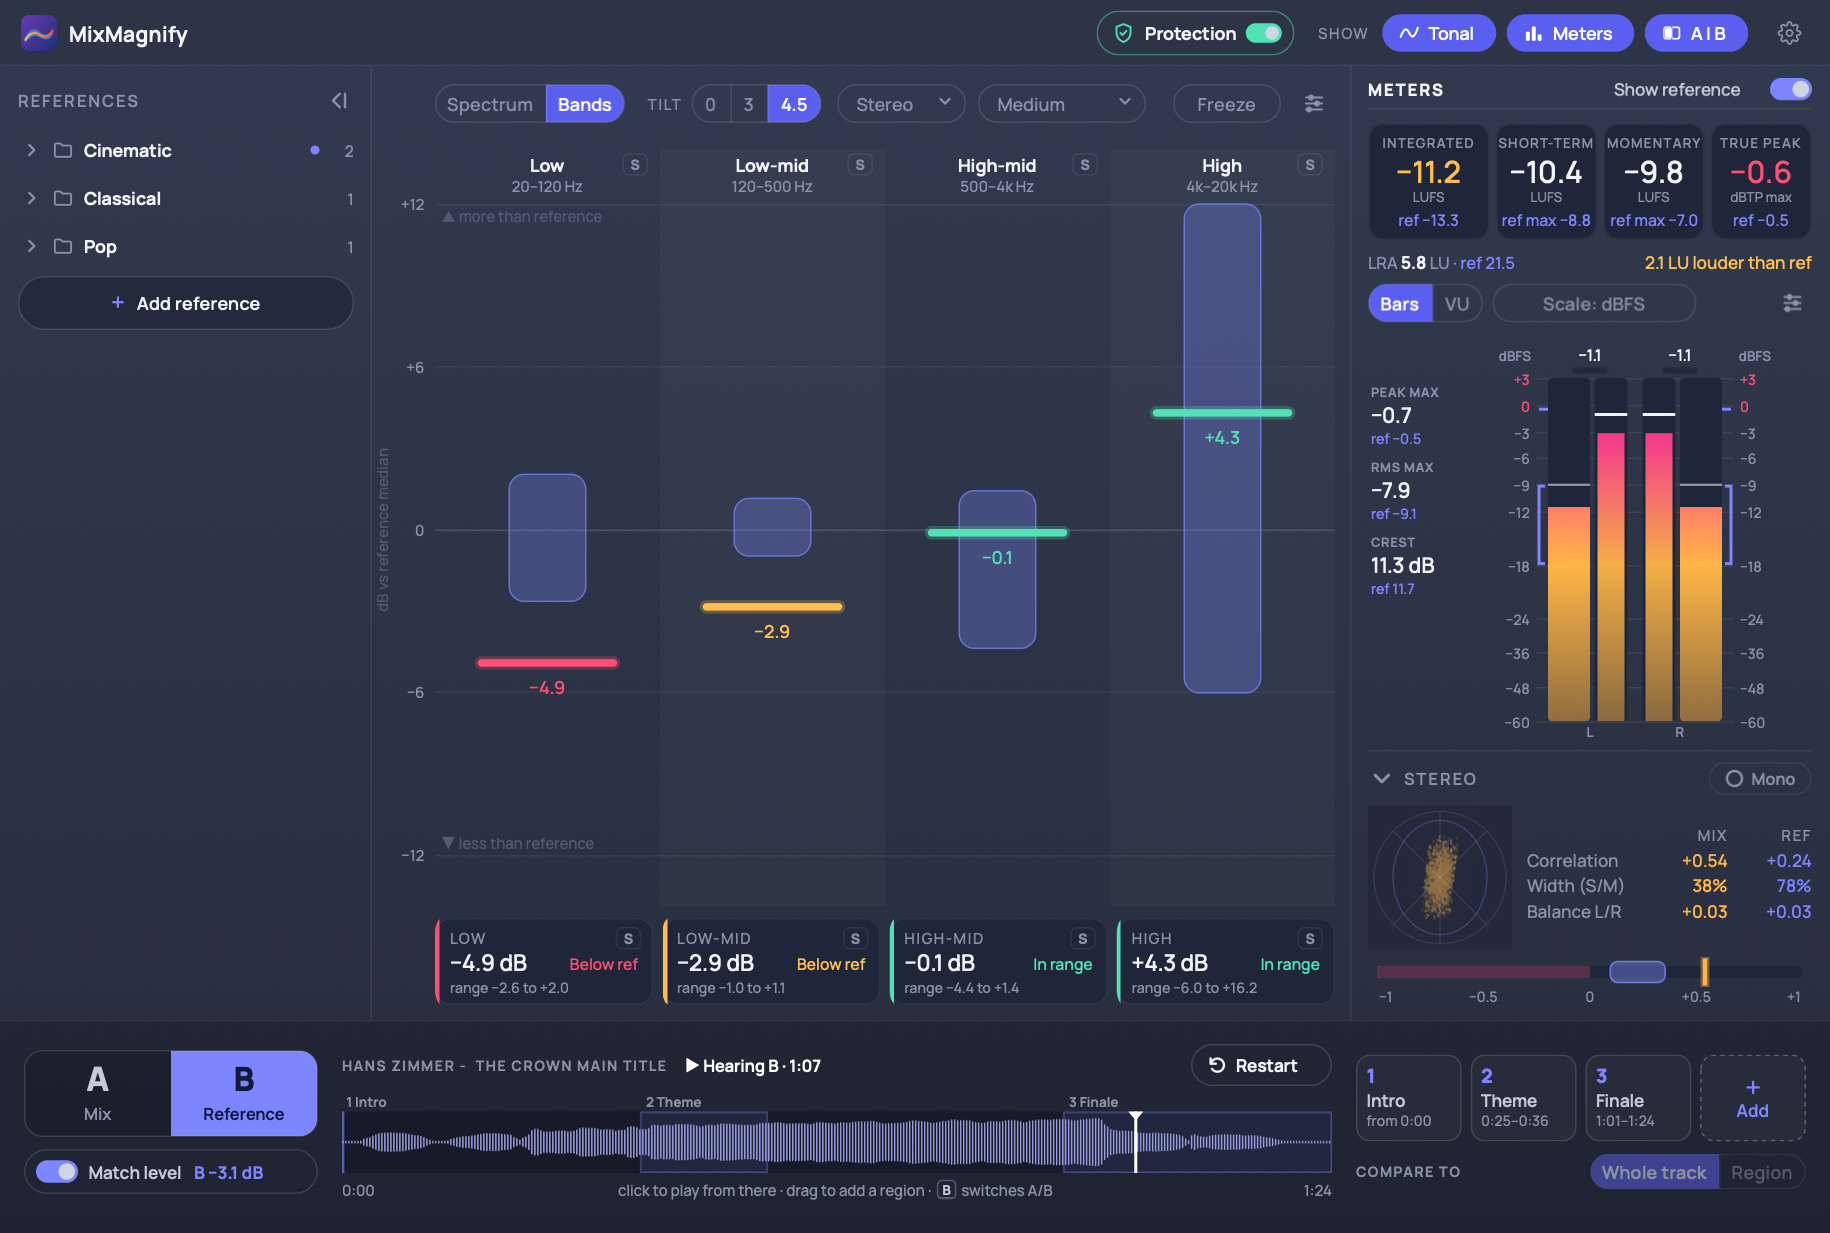
The switch at the top chooses between Spectrum, the full curve, and Bands, one bar per frequency band. In Bands, each bar shows your mix's total level in that band against the reference's range for the same band.
The buckets under the plot show how far your mix is from the reference's median in each band, in dB. A bucket is green when your mix is inside the reference's range, amber when it's up to 2 dB outside, and red beyond that.
Crossovers
The dashed vertical lines split the spectrum into bands: Sub, Low, Low-Mid, Mid, High-Mid and High. Drag a line to move it, and double-click the plot to add a crossover or double-click a line to remove it. You can have between 2 to 6 bands. Reset bands to default in the Options menu brings back the default four bands (crossovers at 120 Hz, 500 Hz and 4 kHz).
Band Solo
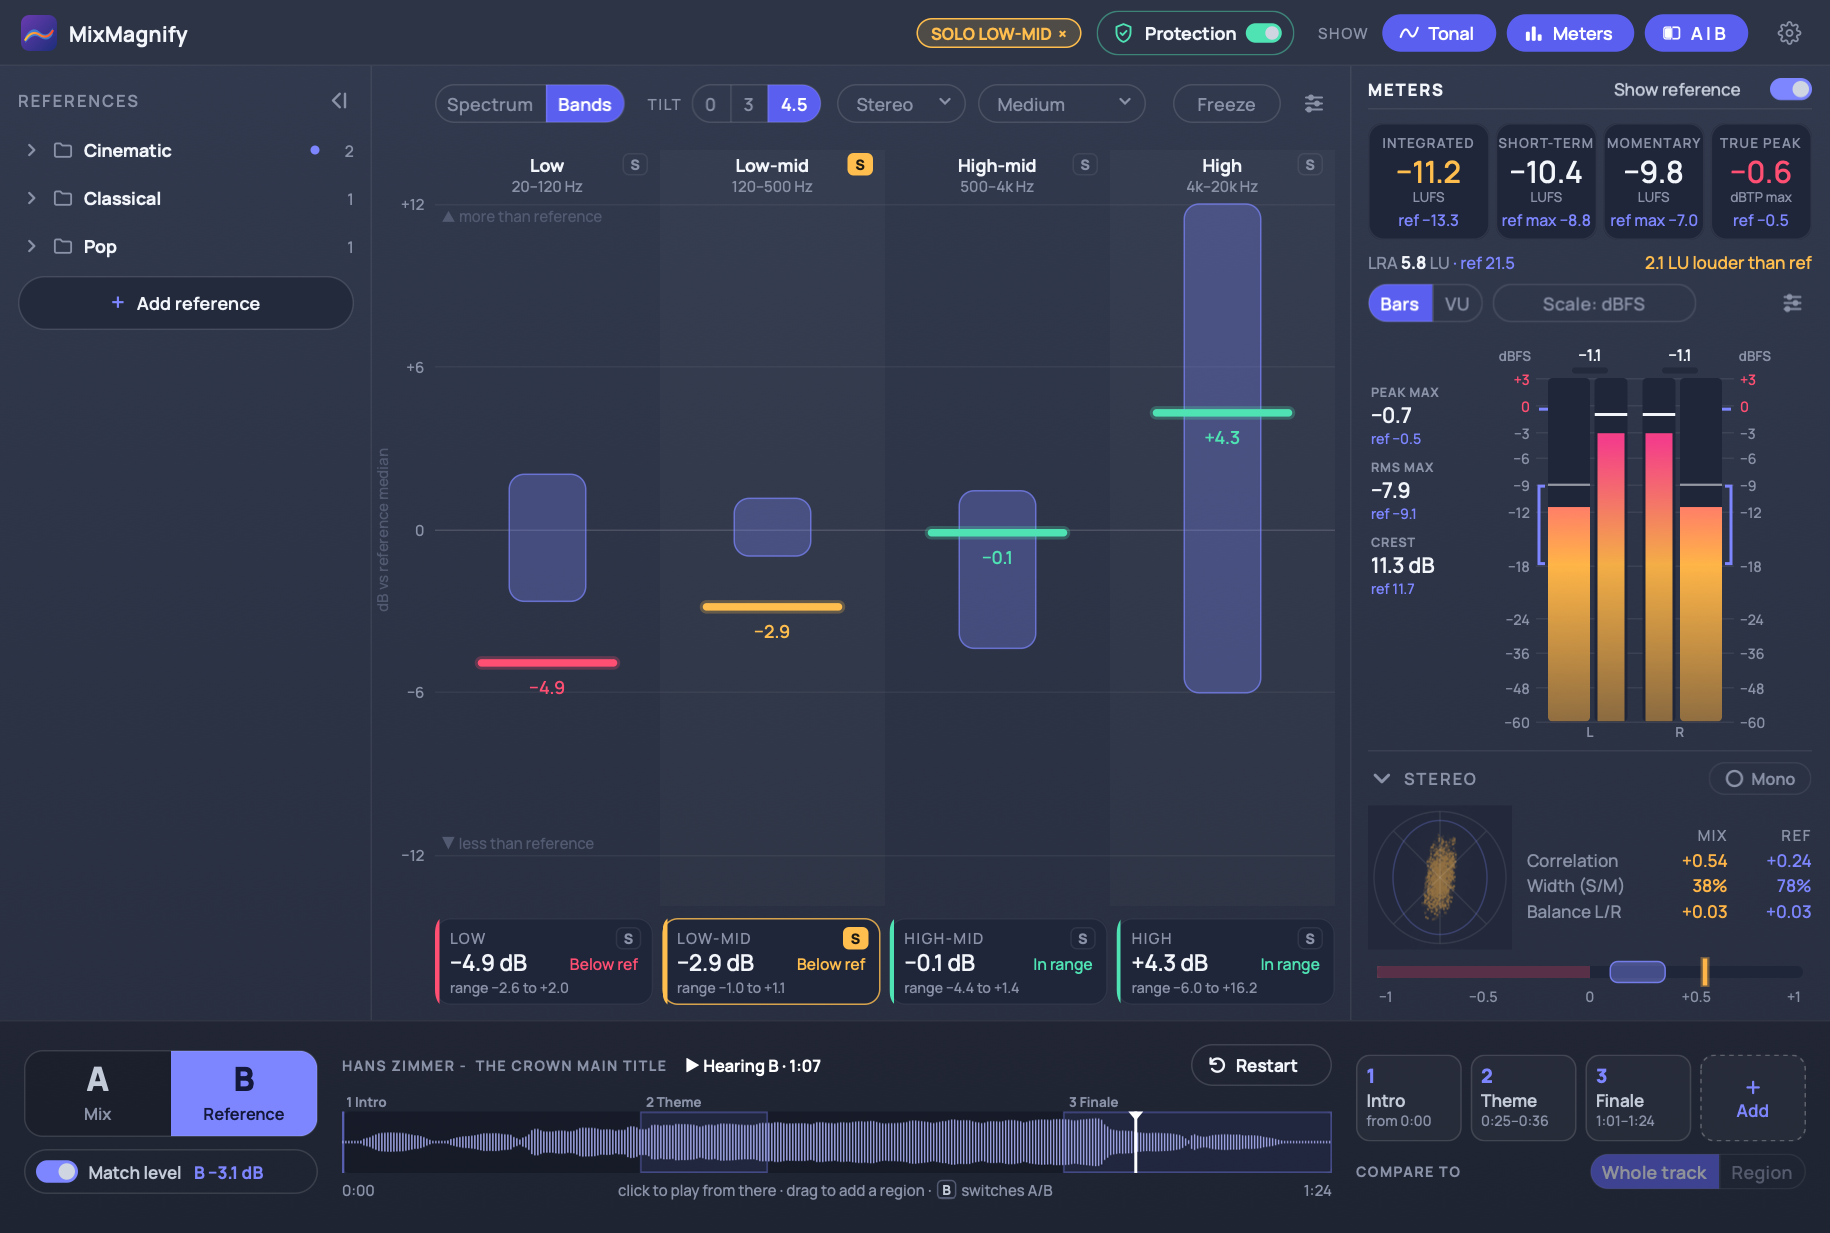
Click the S button on a band to hear only that band, so you can hear exactly what the curve is pointing at. One band plays at a time, and a SOLO badge appears in the toolbar. Click S again (or the badge) to hear everything. The meters keep measuring the whole mix while you solo. Solo isn't saved with your project, so a session never reopens with just one band playing.
Tilt
Tilt rotates the whole display around 1 kHz. It changes only the drawing, never the numbers. Music naturally has less energy at high frequencies, so an untilted spectrum slopes down, left to right.
- 0 shows the raw spectrum.
- 3 makes pink noise flat.
- 4.5 (the default) makes typical music roughly flat, so differences are easier to see.
Channel
- Stereo: both channels together.
- Mid: what's common to both channels (the center).
- Side: the difference between them (the width). Side is handy for checking that your low end stays centered.
Response
Response sets how much time the mix curve averages over.
- Fast, Medium (the default) and Slow average the last 1, 3 or 10 seconds, with louder moments counting more.
- Playthrough averages everything since you pressed play, measured exactly the way a reference is. Like Integrated loudness, it restarts when you play from stop and holds when you stop. If you play the reference file itself, the curve would land right on its median.
Use Medium while you're working on a section, and Playthrough for a whole-song comparison once you play the mix from top to bottom.
Smoothing
In the Options menu, Smoothing sets how much the curves are smoothed: 1/3 octave, 1 octave, 2 octaves (the default) or 3 octaves. Wider smoothing hides small peaks and dips and shows the broad balance.
Freeze
Click Freeze to keep a copy of the current mix curve as a dashed ghost line. The button reads Frozen while it's on. Make a change, then compare the live curve with the frozen one. Click again to clear it.
The Meters Panel
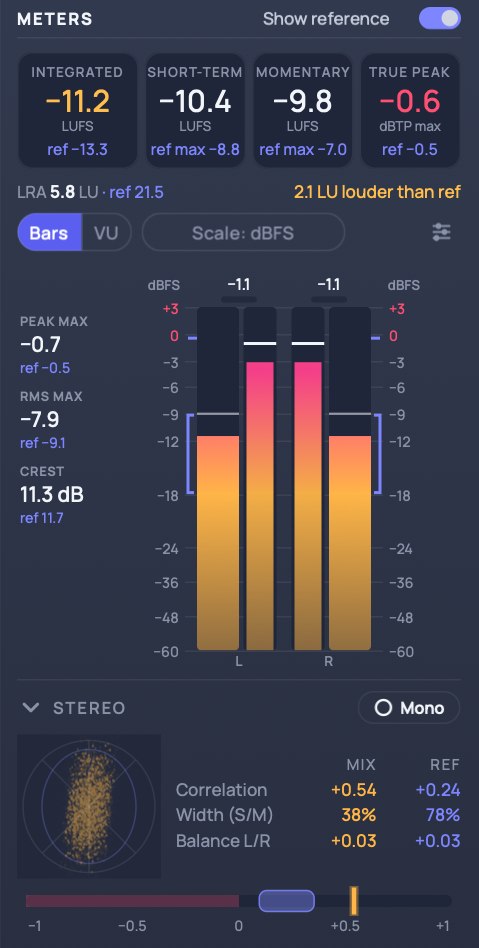
The Meters panel shows loudness, true peak, levels and stereo image. Under each of your numbers, a smaller ref value shows the same measurement for the reference, so you can see how your mix compares.
Everything is measured on the plugin's input, before Mono and Overload Protection. Turning Mono on changes what you hear, not what the meters read.
Show reference
The Show reference switch in the panel's header hides all the reference values, ranges and marks, so the panel works as a plain set of meters.
Loudness and true peak
Loudness follows the ITU-R BS.1770 and EBU R128 standards. It's measured in LUFS (loudness units relative to full scale). A difference of one LU works like one dB.
- Integrated: the loudness of everything since you pressed play, one number for the song. Very quiet passages are left out, so silences and fade-outs don't pull it down. This is the number streaming services normalize to. Click it to reset.
- Short-term: loudness over the last 3 seconds. Good for comparing sections, like a verse against a chorus.
- Momentary: loudness over the last 400 ms.
- True peak: the highest true peak since you pressed play. A true peak is the level of the waveform between samples, which can be higher than the highest sample once it's converted to analog or encoded. It turns red above −1 dBTP (or above the ceiling of the streaming target you've chosen).
- LRA (Loudness Range): how much the loudness varies over the song, in LU. A heavily compressed pop master is often 3 to 6 LU; film and orchestral music is often 10 to 20.
For Short-term and Momentary, the reference shows its maximum. The line under the readouts tells you how far your Integrated is from the reference, for example "2.1 LU quieter than ref". Integrated turns green within 1 LU of the reference, amber within 3 LU, and red beyond that.
Stopping and playing again resets Integrated, LRA and true peak. While you're stopped, they hold their values. Jumping back in a loop or cycle doesn't reset them.
Bars
Each channel has an RMS bar and a peak bar.
- Peak: the highest sample level in the last 50 ms.
- Peak hold (the white line, and the number above each channel): the highest peak in the last 2 seconds. Choose Hold (until reset) in the Options menu to keep it until you reset. The number turns red above −1 dBFS.
- Clip light: lights red when a sample goes over 0 dBFS.
- RMS: the average level over 300 ms. By default a full-scale sine signal reads 0 dB RMS (the AES17 convention); you can change this in Settings.
- Peak max, RMS max and Crest: the highest peak and RMS since the last reset, and how far the peaks go above the average level over the last 3 seconds. Heavily limited masters have a crest of around 6 to 8 dB; dynamic mixes 12 dB or more.
- Reference brackets on the scale show the reference's typical RMS range and its peak level.
In the Options menu, Bar style chooses Split (RMS outside, peak inside) or Combined (one bar per channel: solid for RMS, faded for peak).
Scales
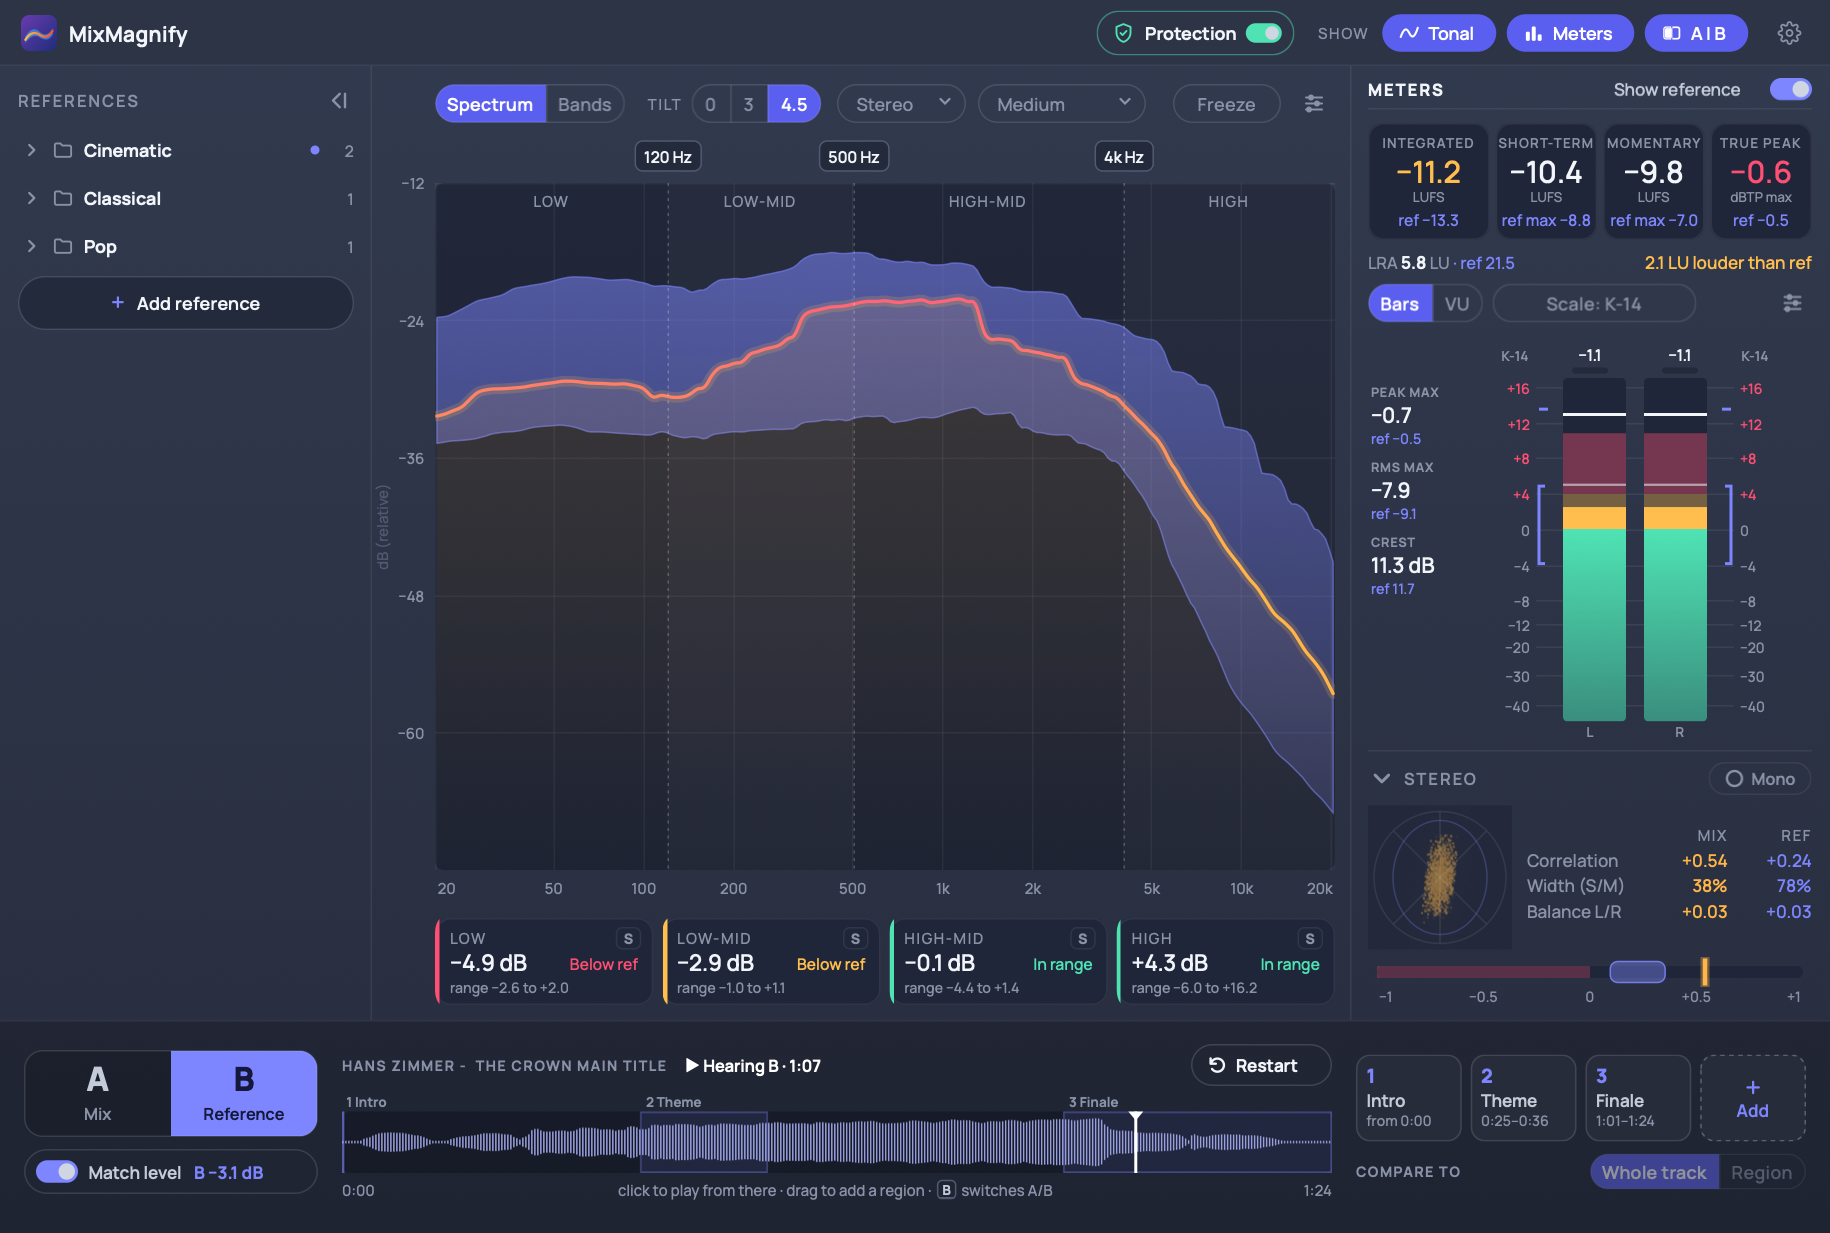
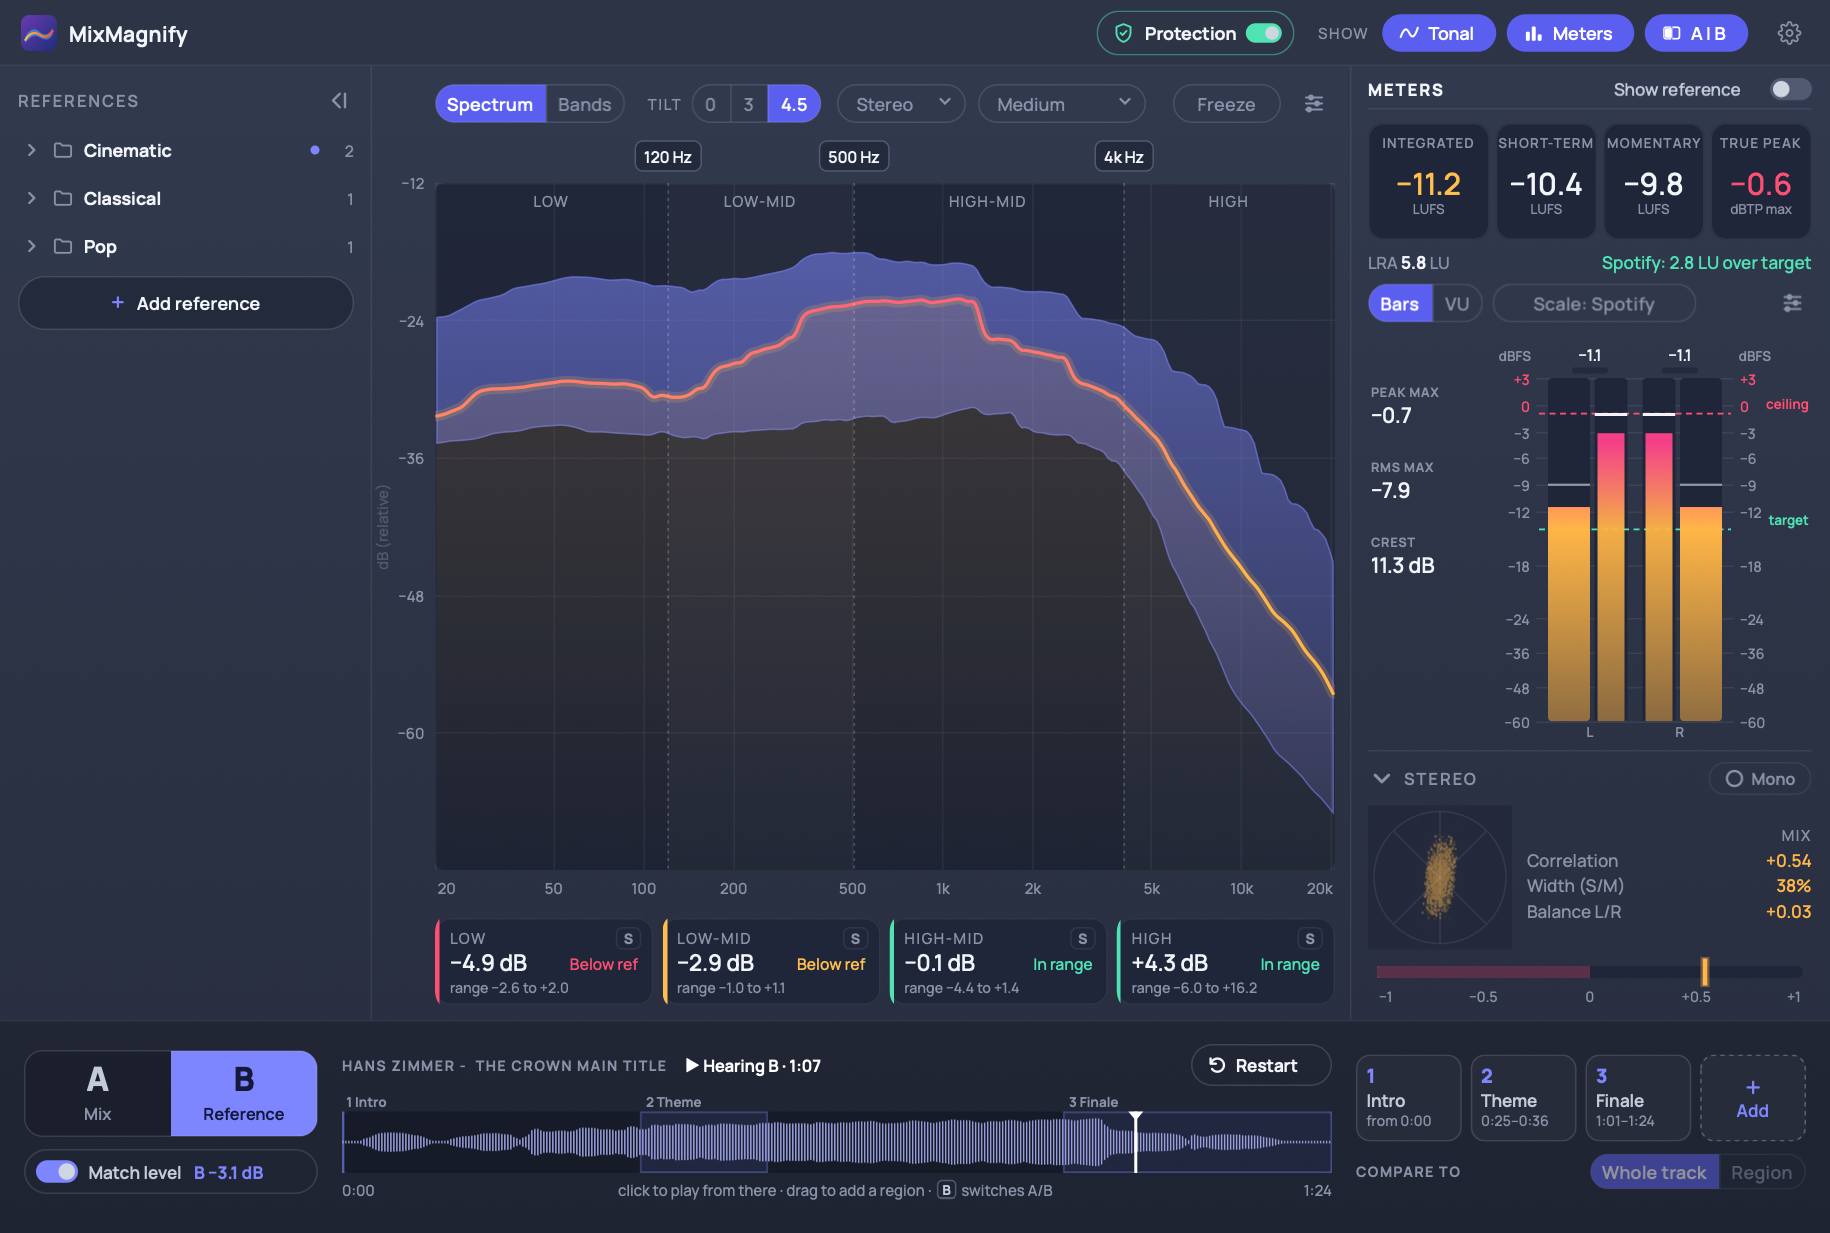
Click the scale name to choose:
- dBFS: plain digital level, where 0 is the digital maximum.
- K-20, K-14 and K-12 (the K-System): 0 on the scale sits at −20, −14 or −12 dBFS RMS. Green is below 0, amber from 0 to +4, red above. K-20 suits film and classical, K-14 pop and rock, K-12 broadcast.
- Streaming targets: Spotify, Apple Music, YouTube, Amazon Music and Tidal by default. A target adds a green target line and a red ceiling line, and the line under the readouts tells you how far you are from its loudness. You can edit the list in Settings, along with their targets.
VU
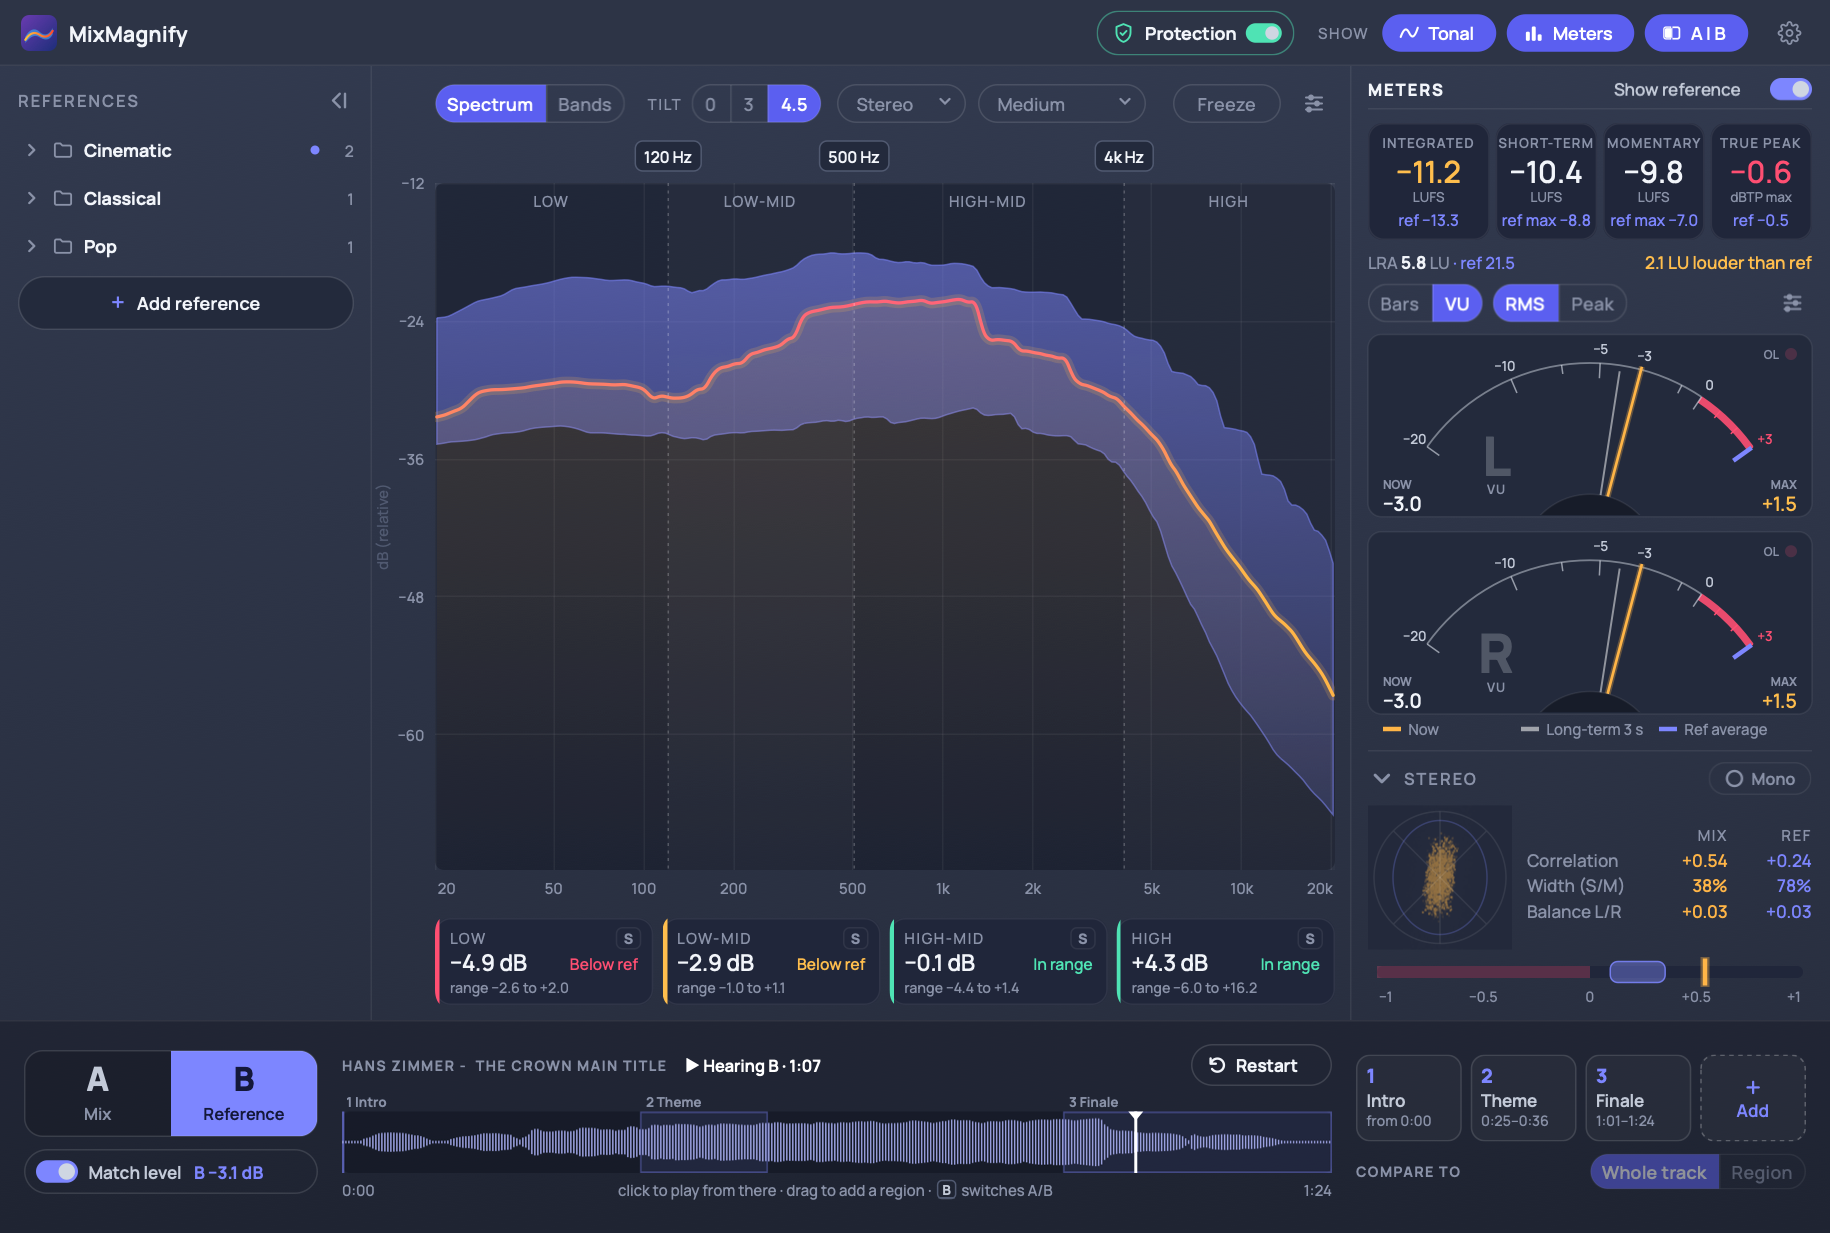
Switch the meter area to VU for a classic VU meter per channel. It's slow on purpose, taking about 300 ms to reach a new level, so it shows the body of the sound rather than its peaks.
- RMS / Peak: RMS is the classic VU movement. Peak turns the dial into a peak programme meter (fast rise, slow fall).
- Long-term needle (white): the average reading over the last 3 seconds.
- Ref average (blue mark): where the reference's typical level sits on the dial.
- NOW / MAX: the current reading and the highest since the last reset.
- VU calibration (Options menu): which digital level reads 0 VU: −20, −18, −14, −12, −8 or 0 dBFS. −18 is common for mixing. The default for new instances is in Settings.
Stereo
- Goniometer: plots mid (up) against side (across). A mono signal is a vertical line, and a wide mix spreads sideways. A shape leaning left or right means one channel is louder; a wide, flat shape means out-of-phase content.
- Correlation: how alike left and right are, from −1 to +1. +1 is mono, around 0 is very wide. Below 0 (the red half), the channels partly cancel and your mix will lose level and low end in mono. The blue band shows the reference's typical range.
- Width (S/M): side level divided by mid level. 0% is mono.
- Balance L/R: −1 is all left, 0 is centered, +1 is all right.
Click the arrow in the Stereo header to collapse it to a single correlation meter, which gives the level meters more room.
Mono
The Mono button in the Meters panel sums the output to mono so you can listen for phase problems. A MONO badge shows in the toolbar while it's on. The meters still measure the stereo mix.
A/B Listening
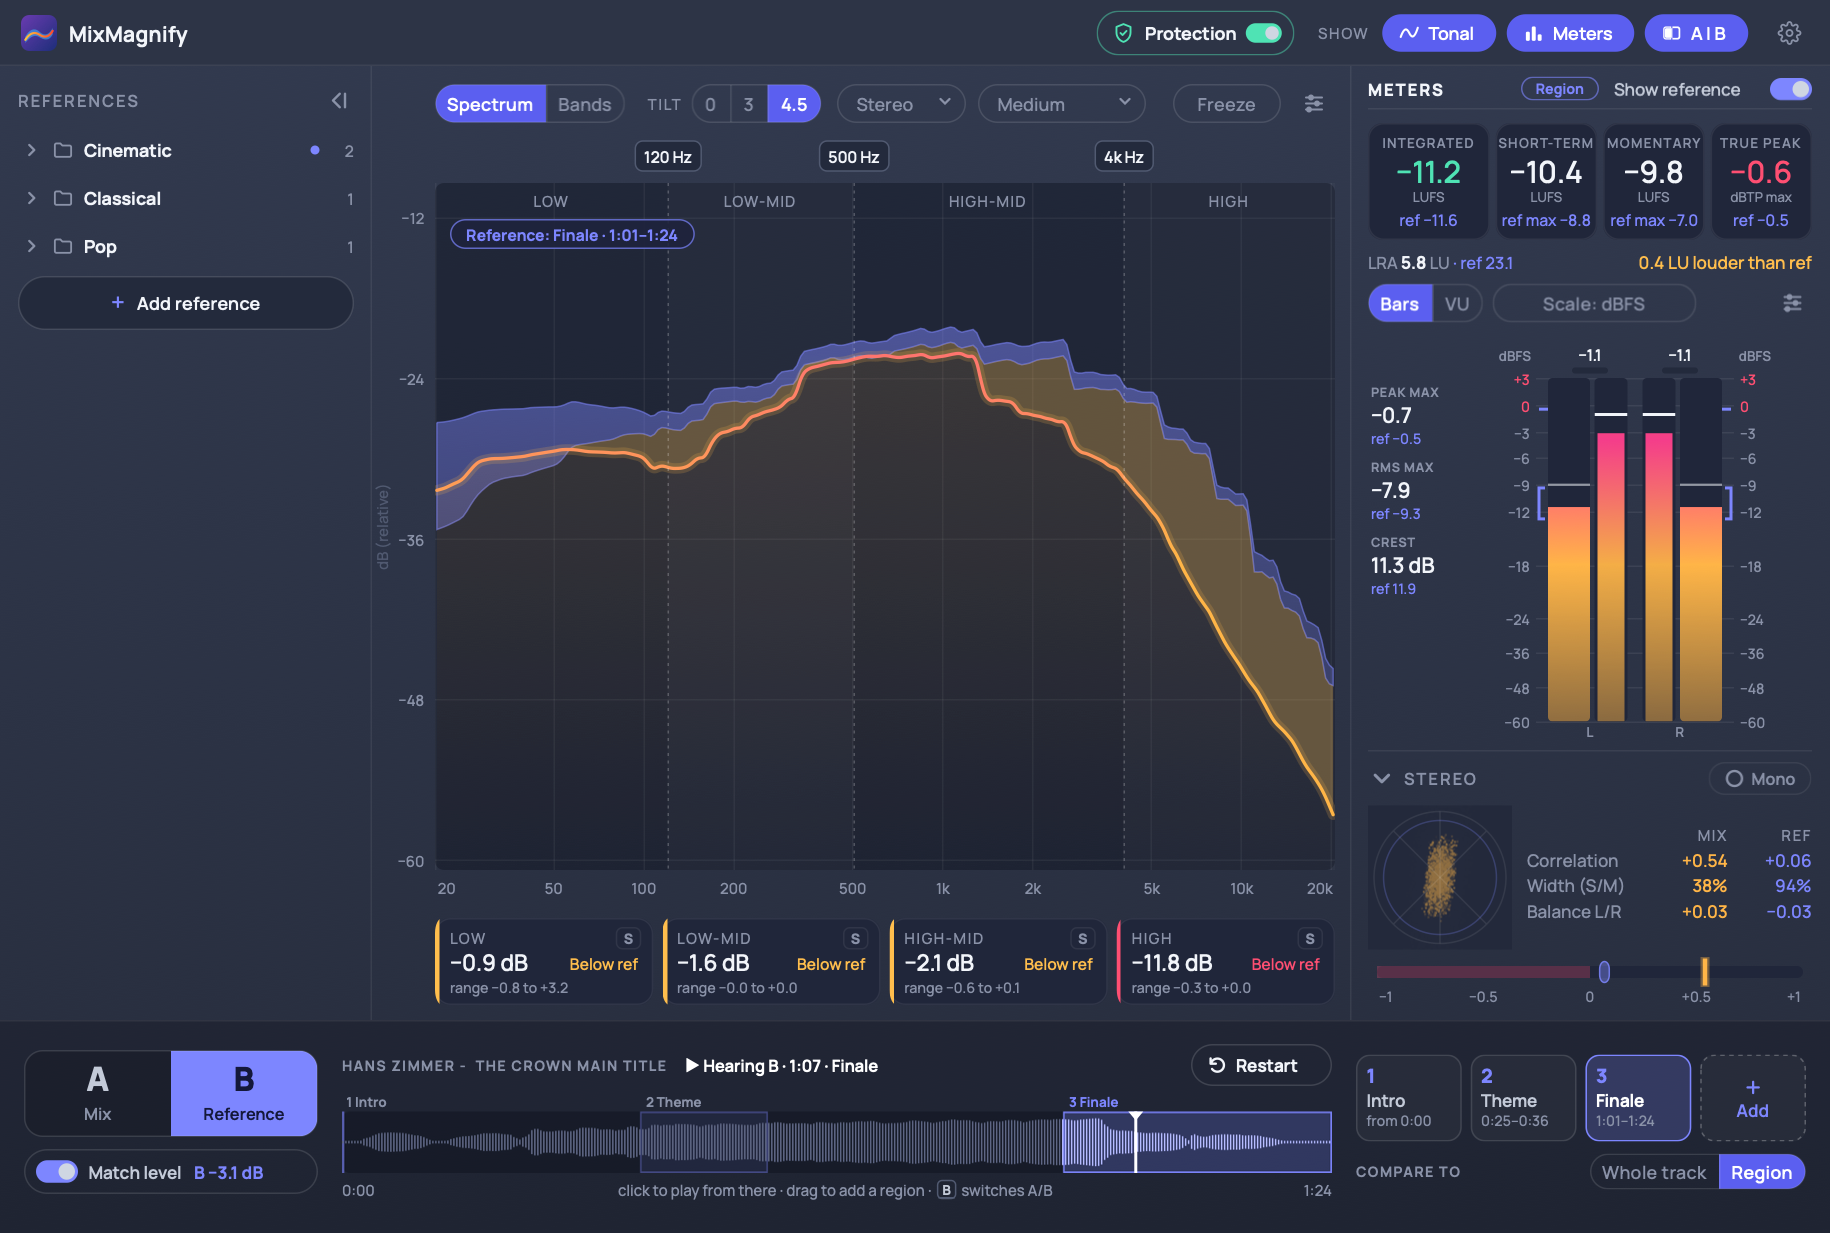
The AB listen bar at the bottom of the window lets you switch between your mix (A, orange) and the reference (B, blue) without leaving your session. MixMagnify plays the reference's own audio file, in parallel with your project: B plays while your DAW's transport is playing and stops when it stops.
The A|B switch
Click the A | B switch, or press B on your keyboard while the plugin window has focus, to flip between your mix and the reference. The switch crossfades, so there's no click. The reference keeps playing in the background while you listen to A, so switching back doesn't restart it.
The A|B switch is also a plugin parameter, so you can map it to a controller or a key command in your DAW.
Match level
With Match level on (the default), MixMagnify plays the reference at the same loudness as your mix (at any point in the mix), so you hear the difference in balance and not just the difference in level. The bar shows how much the reference is turned down or up, for example "B −3.1 dB".
The waveform
The reference's waveform shows where B is playing. Click the waveform to play from that point. Use Restart to go back to the start of the selected region (or of the track).
Start points and regions
Mark the parts of the reference you want to come back to, such as a chorus or the final drop.
- Drag on the waveform to make a region. Give it a name in the popover. Regions loop by default (turn off Loop at the end to let B play on).
- Drag a region's edges to resize it, or its middle to move it.
- Click Add to put a start point at the playhead, or to make a region from the playhead.
- Right-click a region or start point for Rename…, Loop at the end, Use for the curve, Set start to playhead, Set end to playhead and Delete.
Each start point and region gets a flag above the waveform, numbered in time order. Click a flag to jump there. Regions are saved with the reference, so they're there in every project and in the app.
Compare to
Compare to chooses what your mix is compared against: the Whole track, or just the selected Region. With Region, the Tonal view's reference band and every reference value in the Meters panel come from that part of the reference only. A Region tag appears in the Meters header (hover over it to see the region's name). It's the easiest way to check your chorus against the reference's chorus.
LRA needs at least 10 seconds, so it shows “—” for shorter regions.
When B can't play
- The audio file has moved. MixMagnify keeps only the reference's analysis in your library, not a copy of the audio. If you've moved or renamed the file, click Locate file… and find it.
- Captured references. References captured in the MixMagnify app keep only their analysis, so there's no audio for B to play. You can still compare against their curve and meters.
Overload Protection
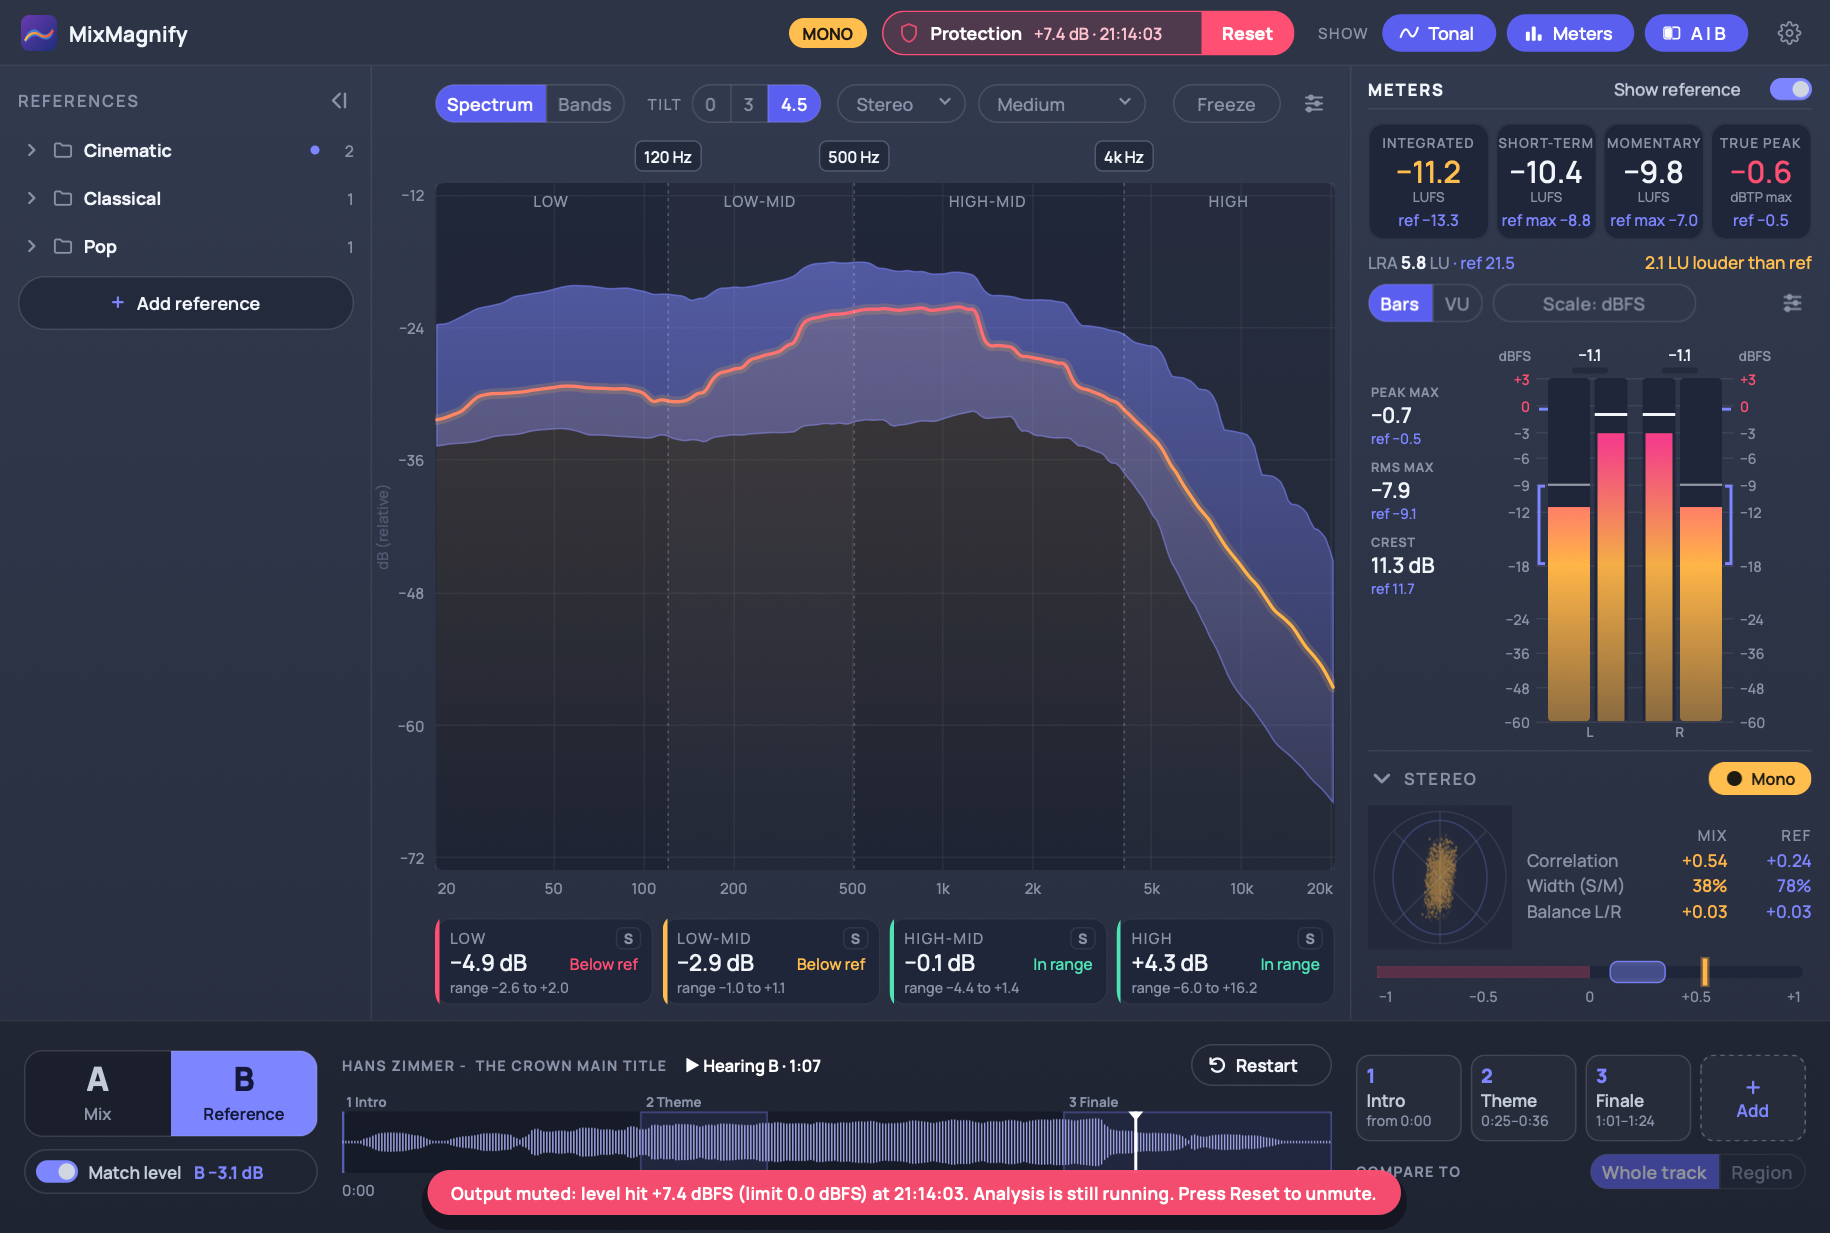
Overload Protection guards your ears and your speakers. If a sample goes over the limit you set, MixMagnify mutes its output at once, before the spike reaches your monitors. A sudden feedback squeal, a plugin that blows up, or a fader pushed by mistake gets caught instead of played.
Off, armed and tripped
The Protection pill in the toolbar has three states:
- Off (grey): nothing is muted.
- Armed (green): MixMagnify is watching your output.
- Tripped (red): the output went over the limit and has been muted. The pill shows the peak level and the time it happened, and a banner appears at the bottom of the window.
While tripped, the output stays muted, but the meters and the Tonal view keep measuring, so you can see what happened. Click Reset on the pill to unmute and re-arm. Click the pill to turn protection on or off.
Limit and mode
Set the limit and mode in Settings > Protection:
- Limit: the level that trips the protection, from −6 to +24 dBFS. The default is 0 dBFS.
- Mode: Zero latency (instant mute) mutes on the first sample over the limit, adding no delay. Lookahead (1 to 5 ms) delays the audio slightly so it can fade out cleanly, and also catches true peaks between samples. By default, MixMagnify's protection is set to 1ms Lookahead mode.
- Armed in new instances: whether protection starts armed when you add MixMagnify to a project.
Overload Protection only acts on the audio passing through MixMagnify. It can't protect against anything after the plugin, which is another reason to put it last on your main output.
When a trial session ends, MixMagnify passes audio through untouched and Overload Protection turns off.
Settings
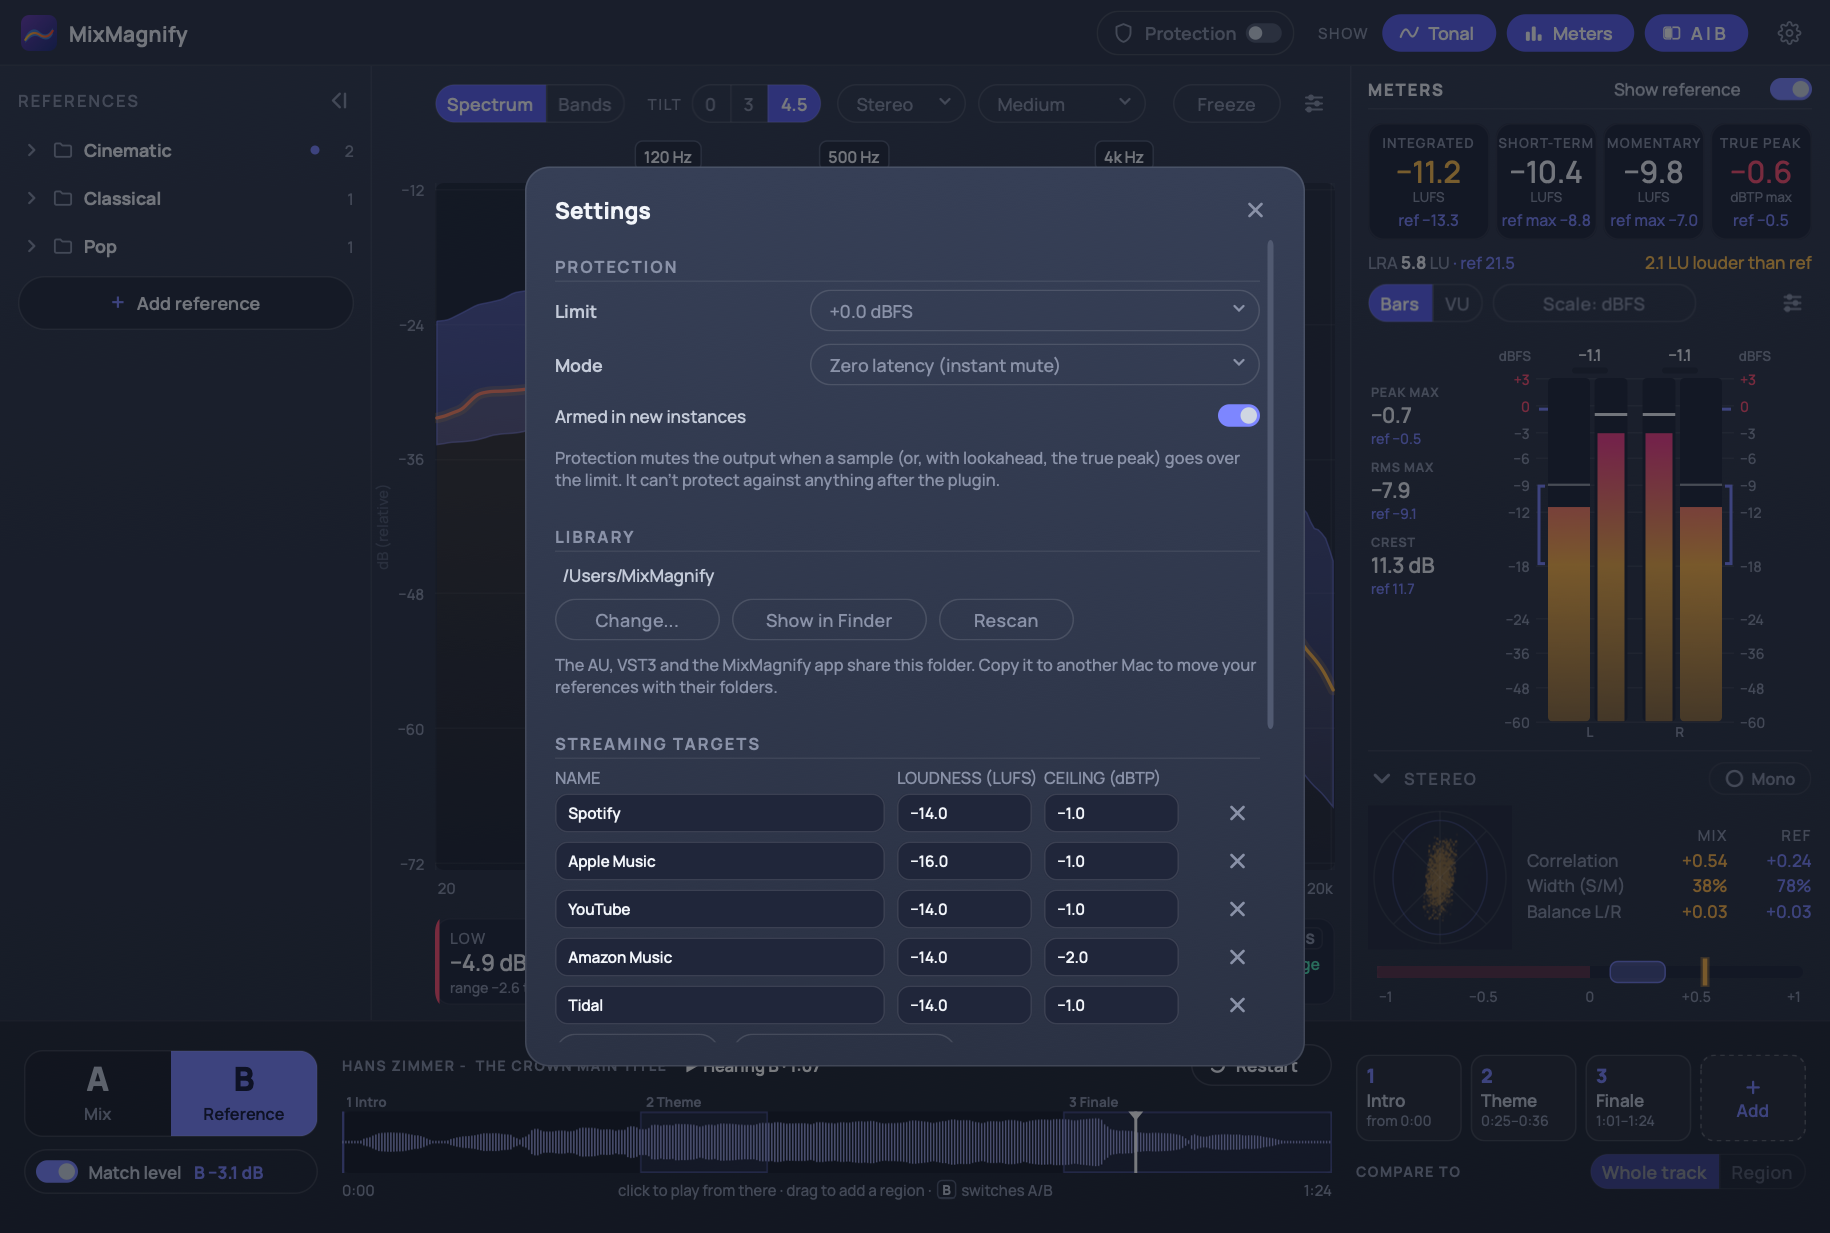
Click the cog at the top right to open Settings. Settings are shared by every MixMagnify instance on your computer. Reset to defaults at the bottom puts everything back.
Library
Shows where your reference library lives. Change… picks another folder, Show opens it in your file browser, and Rescan reads it again. The plugin and the app share this folder. Copy it to another computer to move your references, with their folders.
Protection
The Overload Protection Limit, Mode and Armed in new instances (see above).
Meters
- RMS reads a full-scale sine as 0 dBFS (AES17): on by default. Turn it off to show RMS without the +3 dB offset, where a full-scale sine reads −3 dB.
- VU calibration: the default calibration for new instances.
Streaming targets
The targets offered in the meters' scale menu, each with a name, a loudness in LUFS and a true-peak ceiling in dBTP. The defaults:
| Target | Loudness | Ceiling |
|---|---|---|
| Spotify | −14 LUFS | −1 dBTP |
| Apple Music | −16 LUFS | −1 dBTP |
| YouTube | −14 LUFS | −1 dBTP |
| Amazon Music | −14 LUFS | −2 dBTP |
| Tidal | −14 LUFS | −1 dBTP |
Click New target to add one, or Remove to delete one.
Display
Window size sets the plugin window's size, from 75% to 200%.
About
Shows your version, your license, and where the settings file is.
Display choices you make, such as tilt, response, smoothing and which panels are showing, become the starting point for new instances. Each project still reopens exactly as you left it.
The MixMagnify App
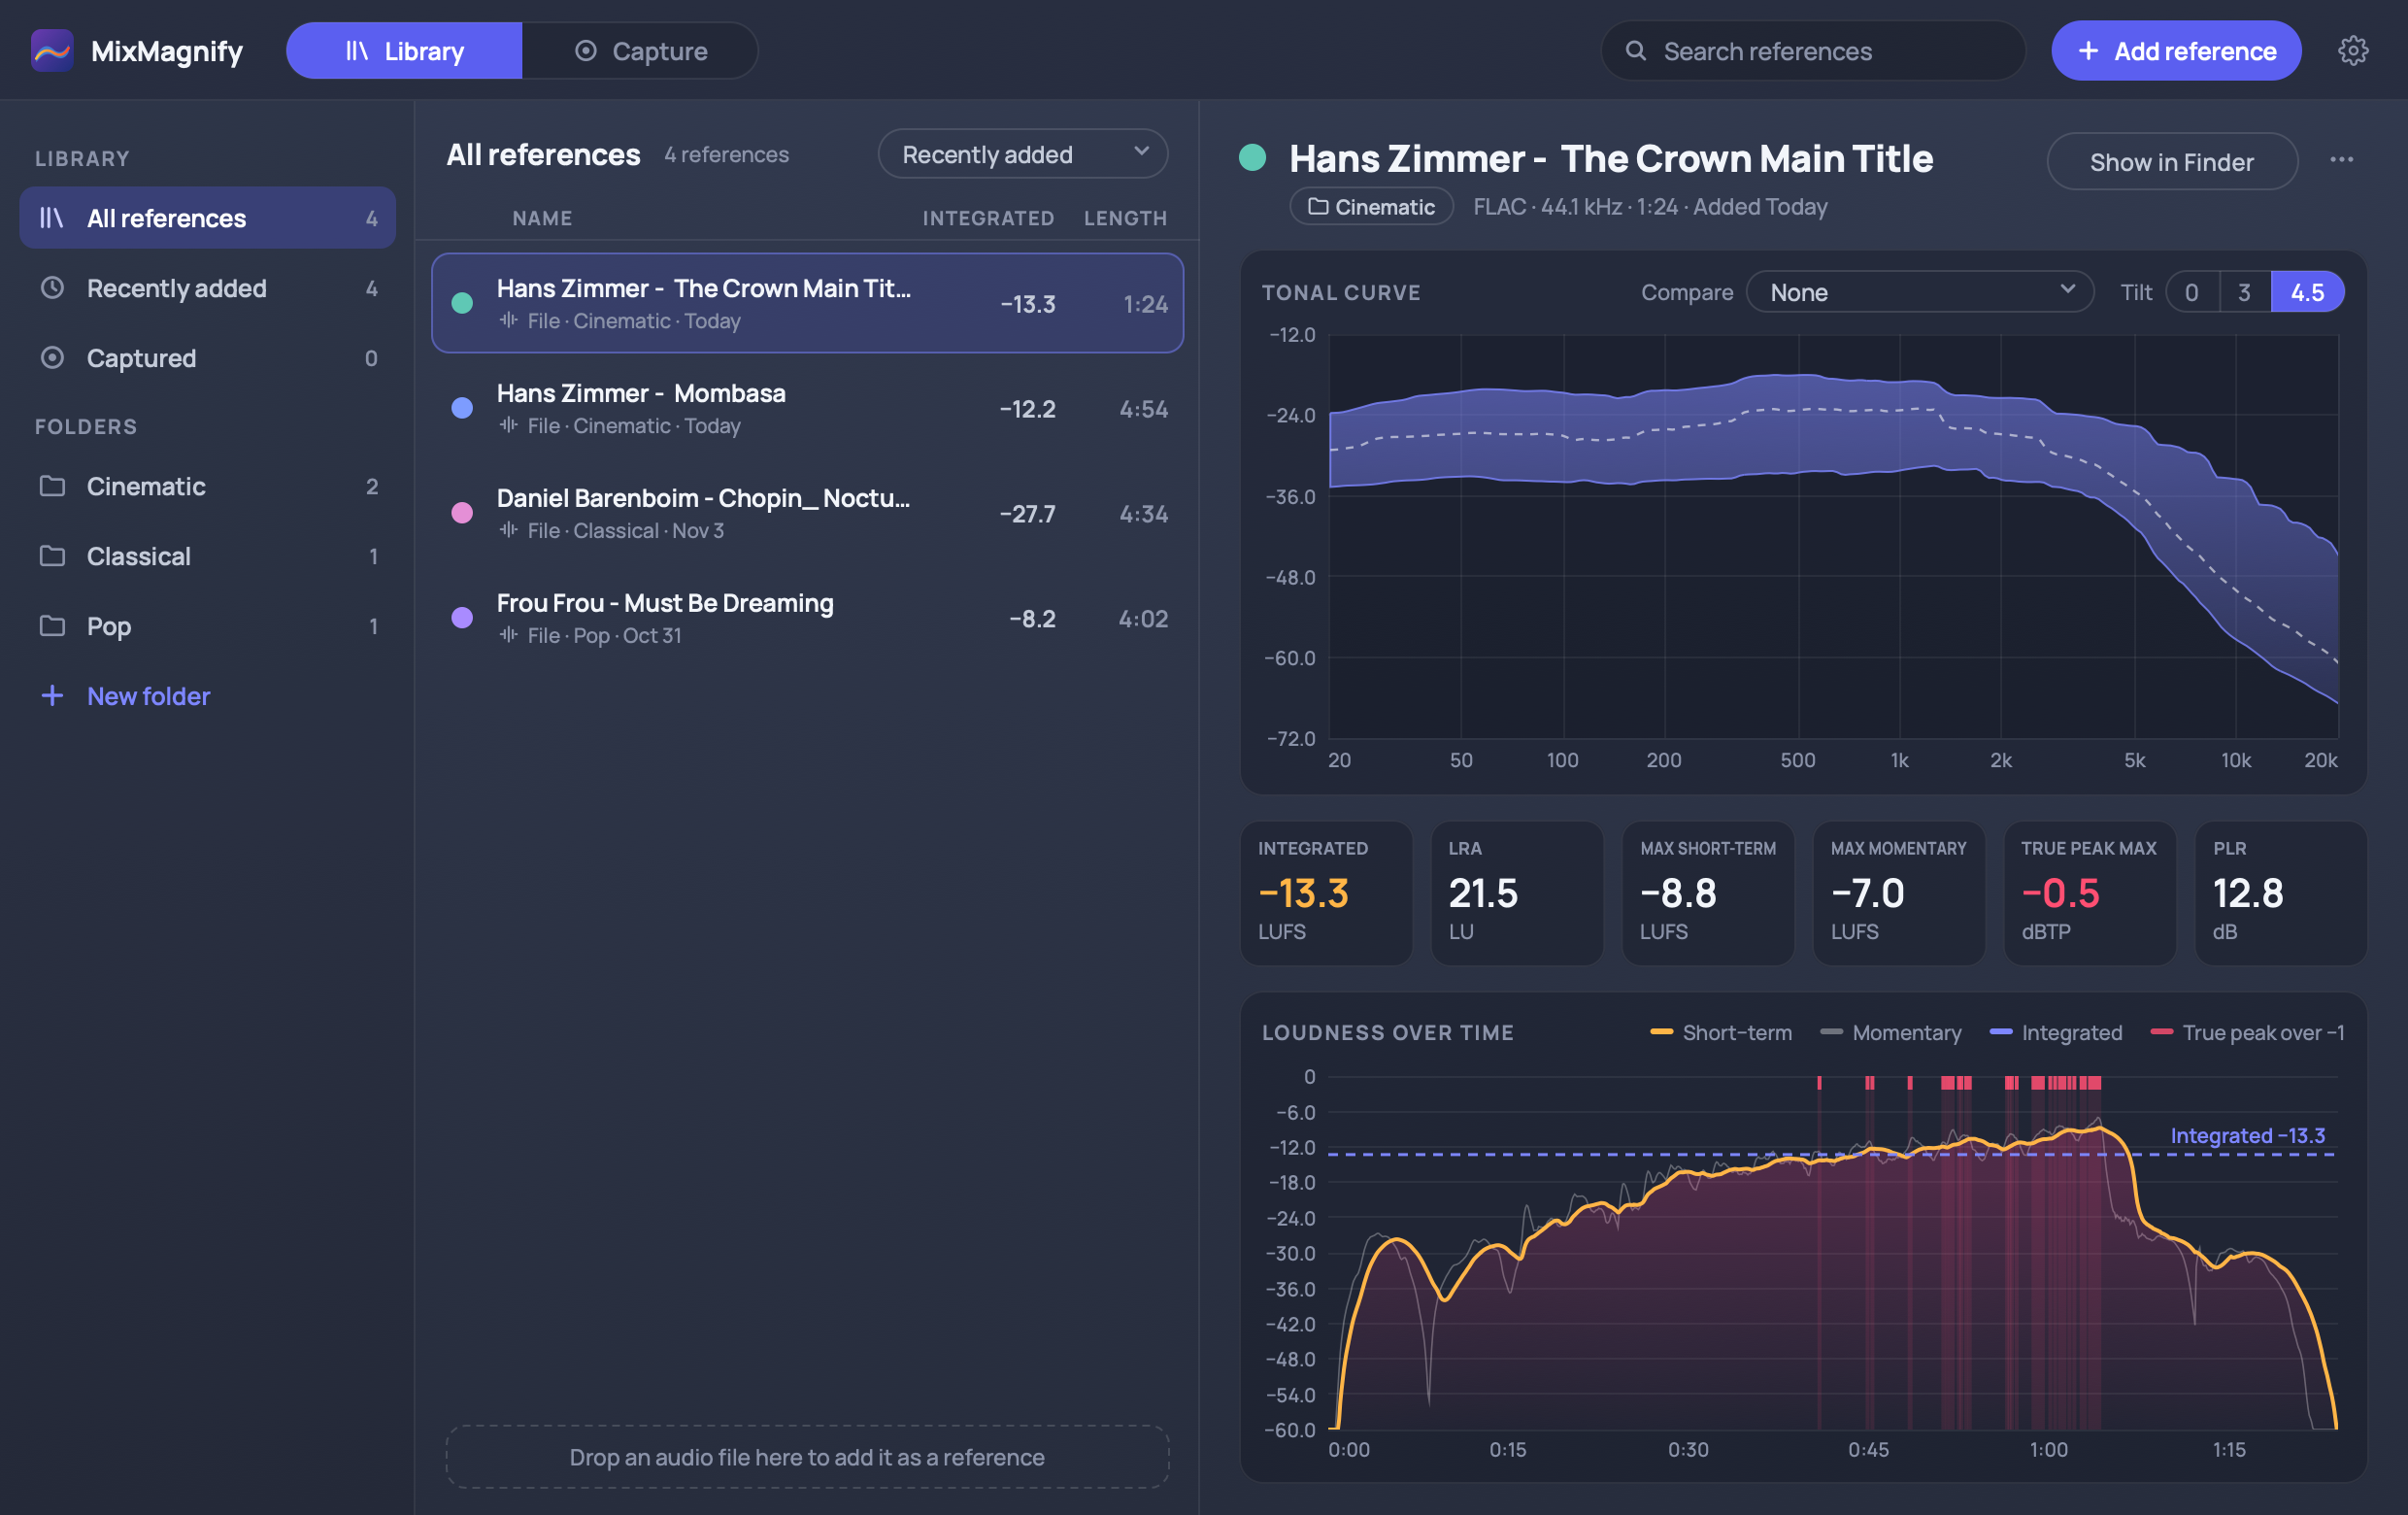
The MixMagnify standalone app is where you can build and manage your reference library outside of your DAW. Everything you add in the app appears in the plugin within a couple of seconds, ready to compare against your mix, and the other way round.
The app has two screens, chosen at the top left: Library and Capture. The Add reference button, the search field and the Settings cog sit in the toolbar.
Library
The sidebar on the left shows you All references, Recently added, Captured and your Folders. The list in the middle shows each reference's name, length and integrated loudness. Type in the search field to find a reference by name, and use the sort menu to order the list by date added, name, loudness or length.
To add a reference, drop an audio file on the window, or click Add reference and choose Audio file…. The same New reference sheet as in the plugin opens, and the analysis runs while you name it (see The New reference sheet).
Right-click a reference (or use its menu) to Rename, Change color, Move to folder, Re-analyze, Replace audio, Export curve file, Show it in your file browser, or Delete it. Replace audio analyzes a new file for an existing reference, for example a newer master, and keeps its name, color and place in every project that uses it.
Reference detail
Select a reference to see its details on the right:
- Tonal curve: the reference's band and median, with Tilt. Use Compare to lay a second reference's median curve over it.
- Stats: Integrated loudness, LRA, max short-term, max momentary, true peak max and PLR (peak to loudness ratio).
- Loudness over time: the reference's short-term loudness across the whole track, so you can see where the loud and quiet sections are.
Capture from an App
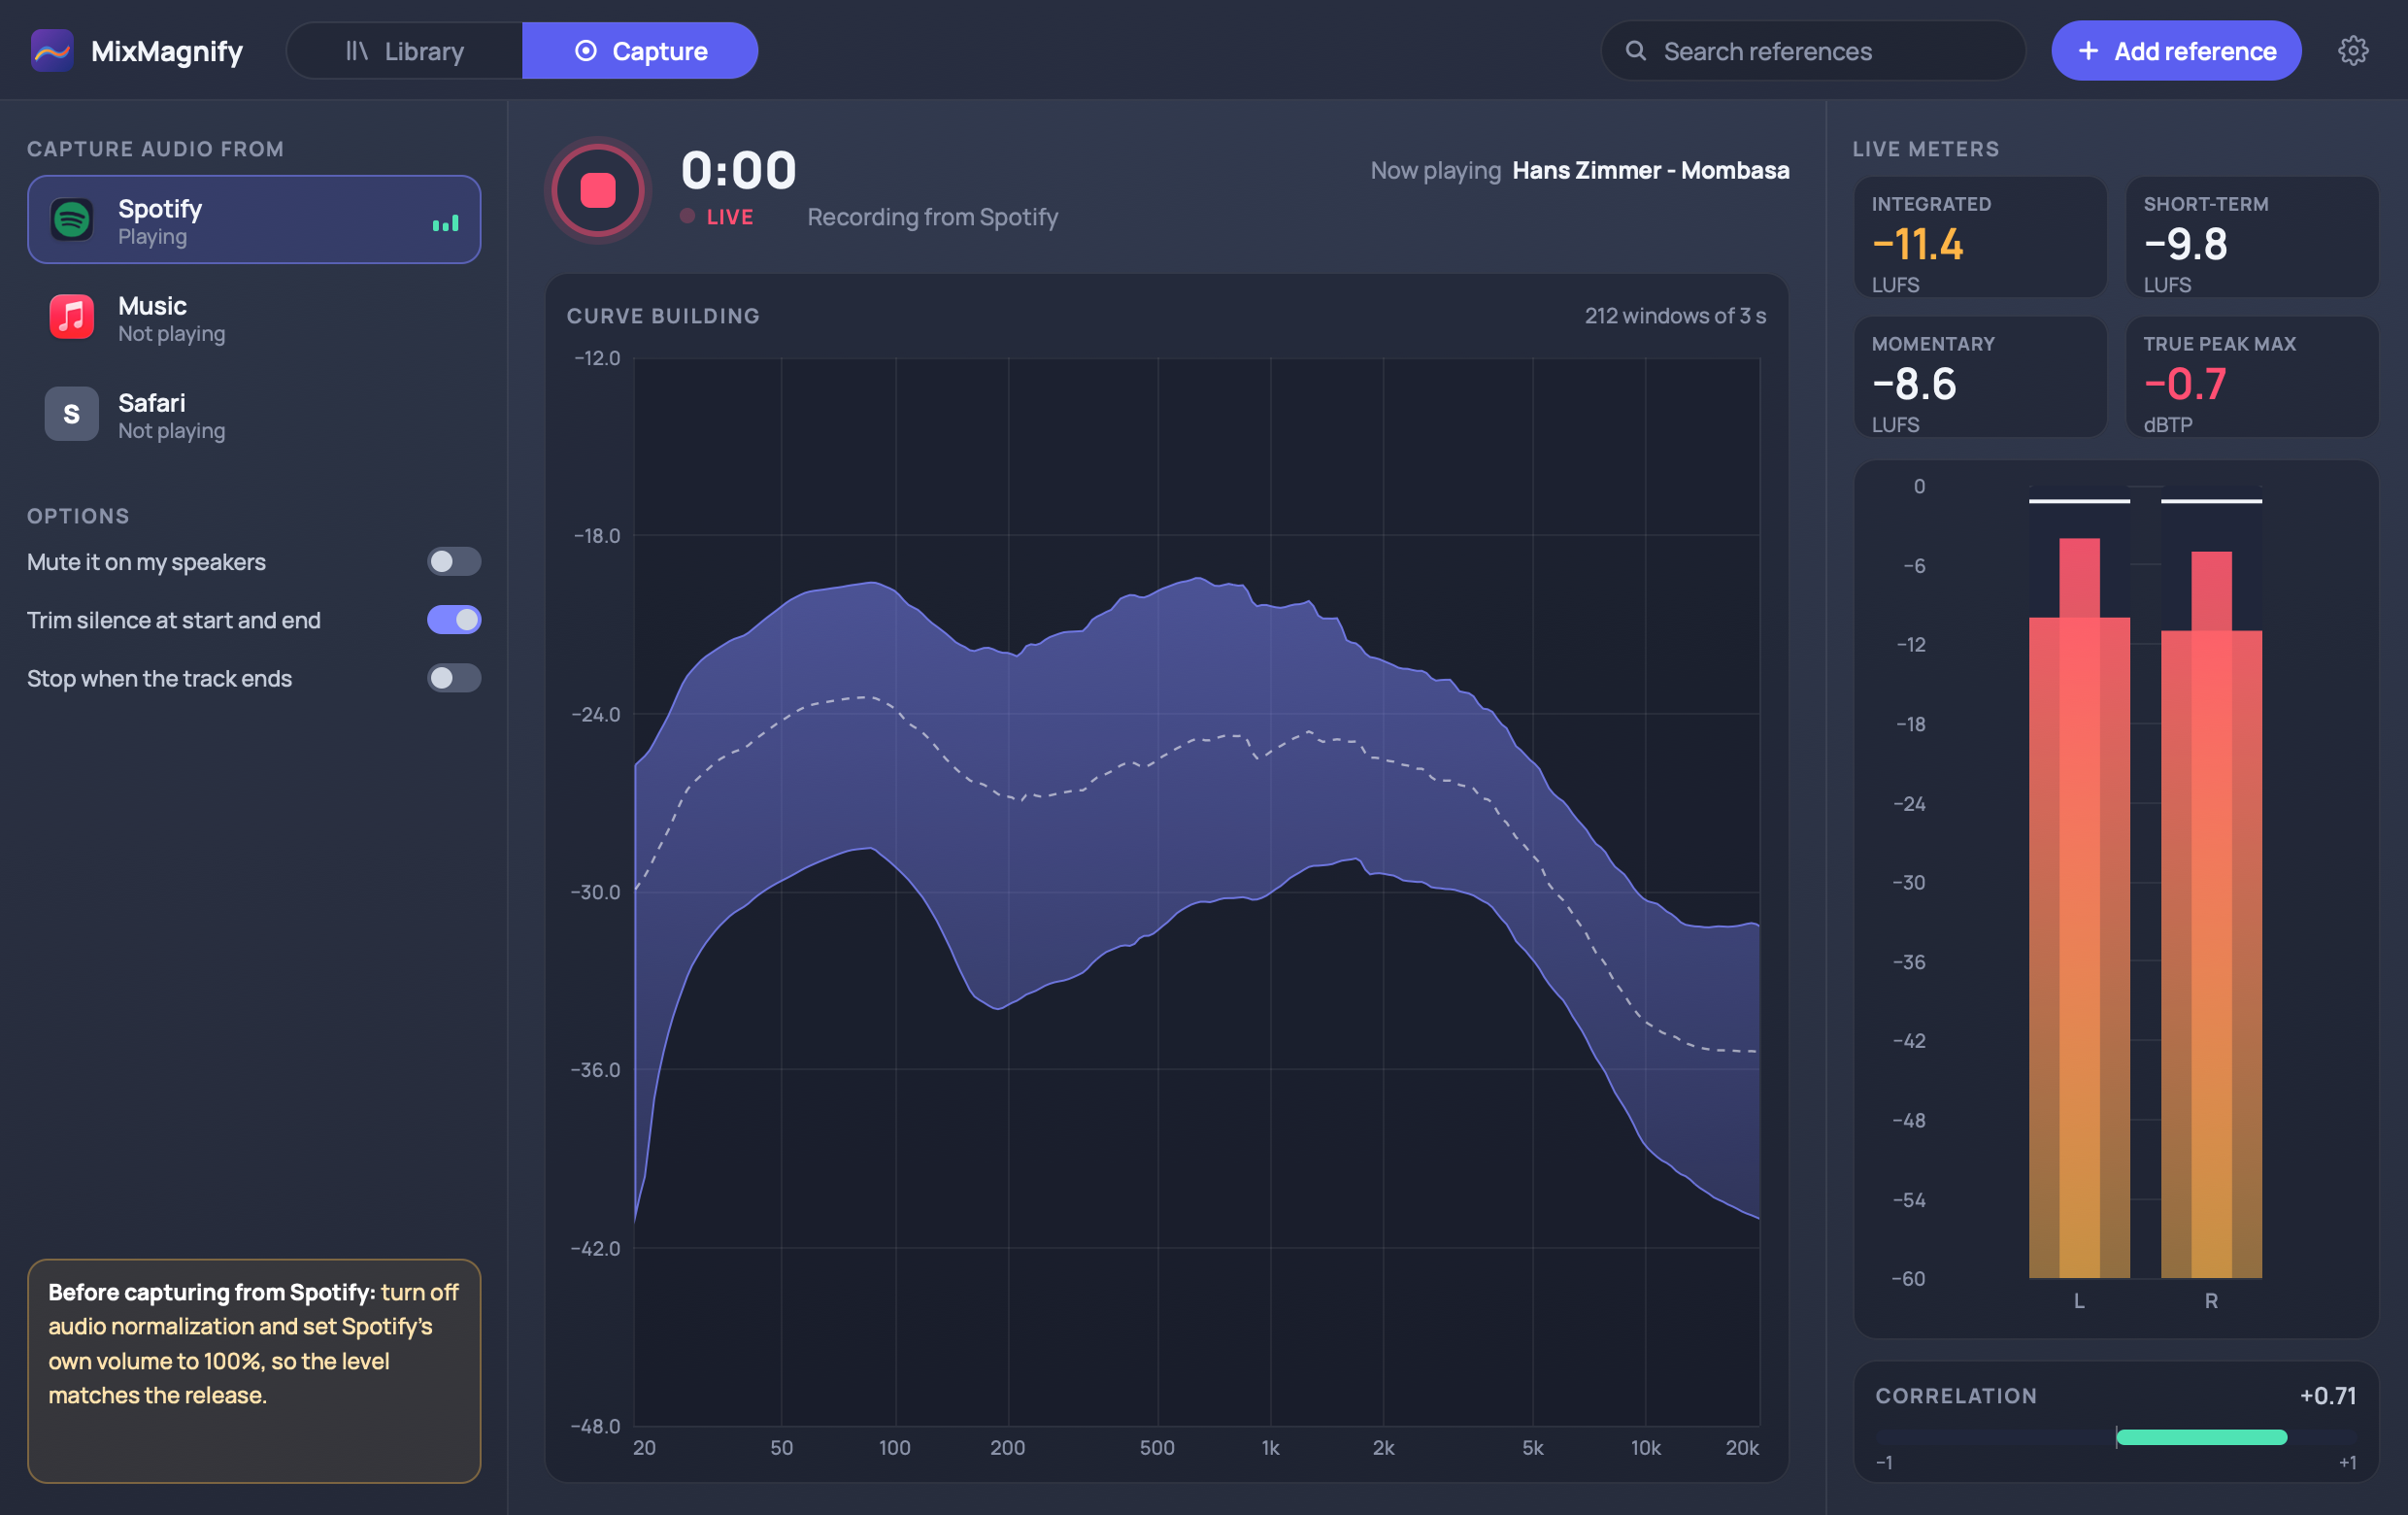
Capture lets you make a reference from a track while it plays in another app: a streaming service, a music player or a browser. MixMagnify listens to that app only, analyzes the track as it plays, and saves the result to your library.
Capturing a track
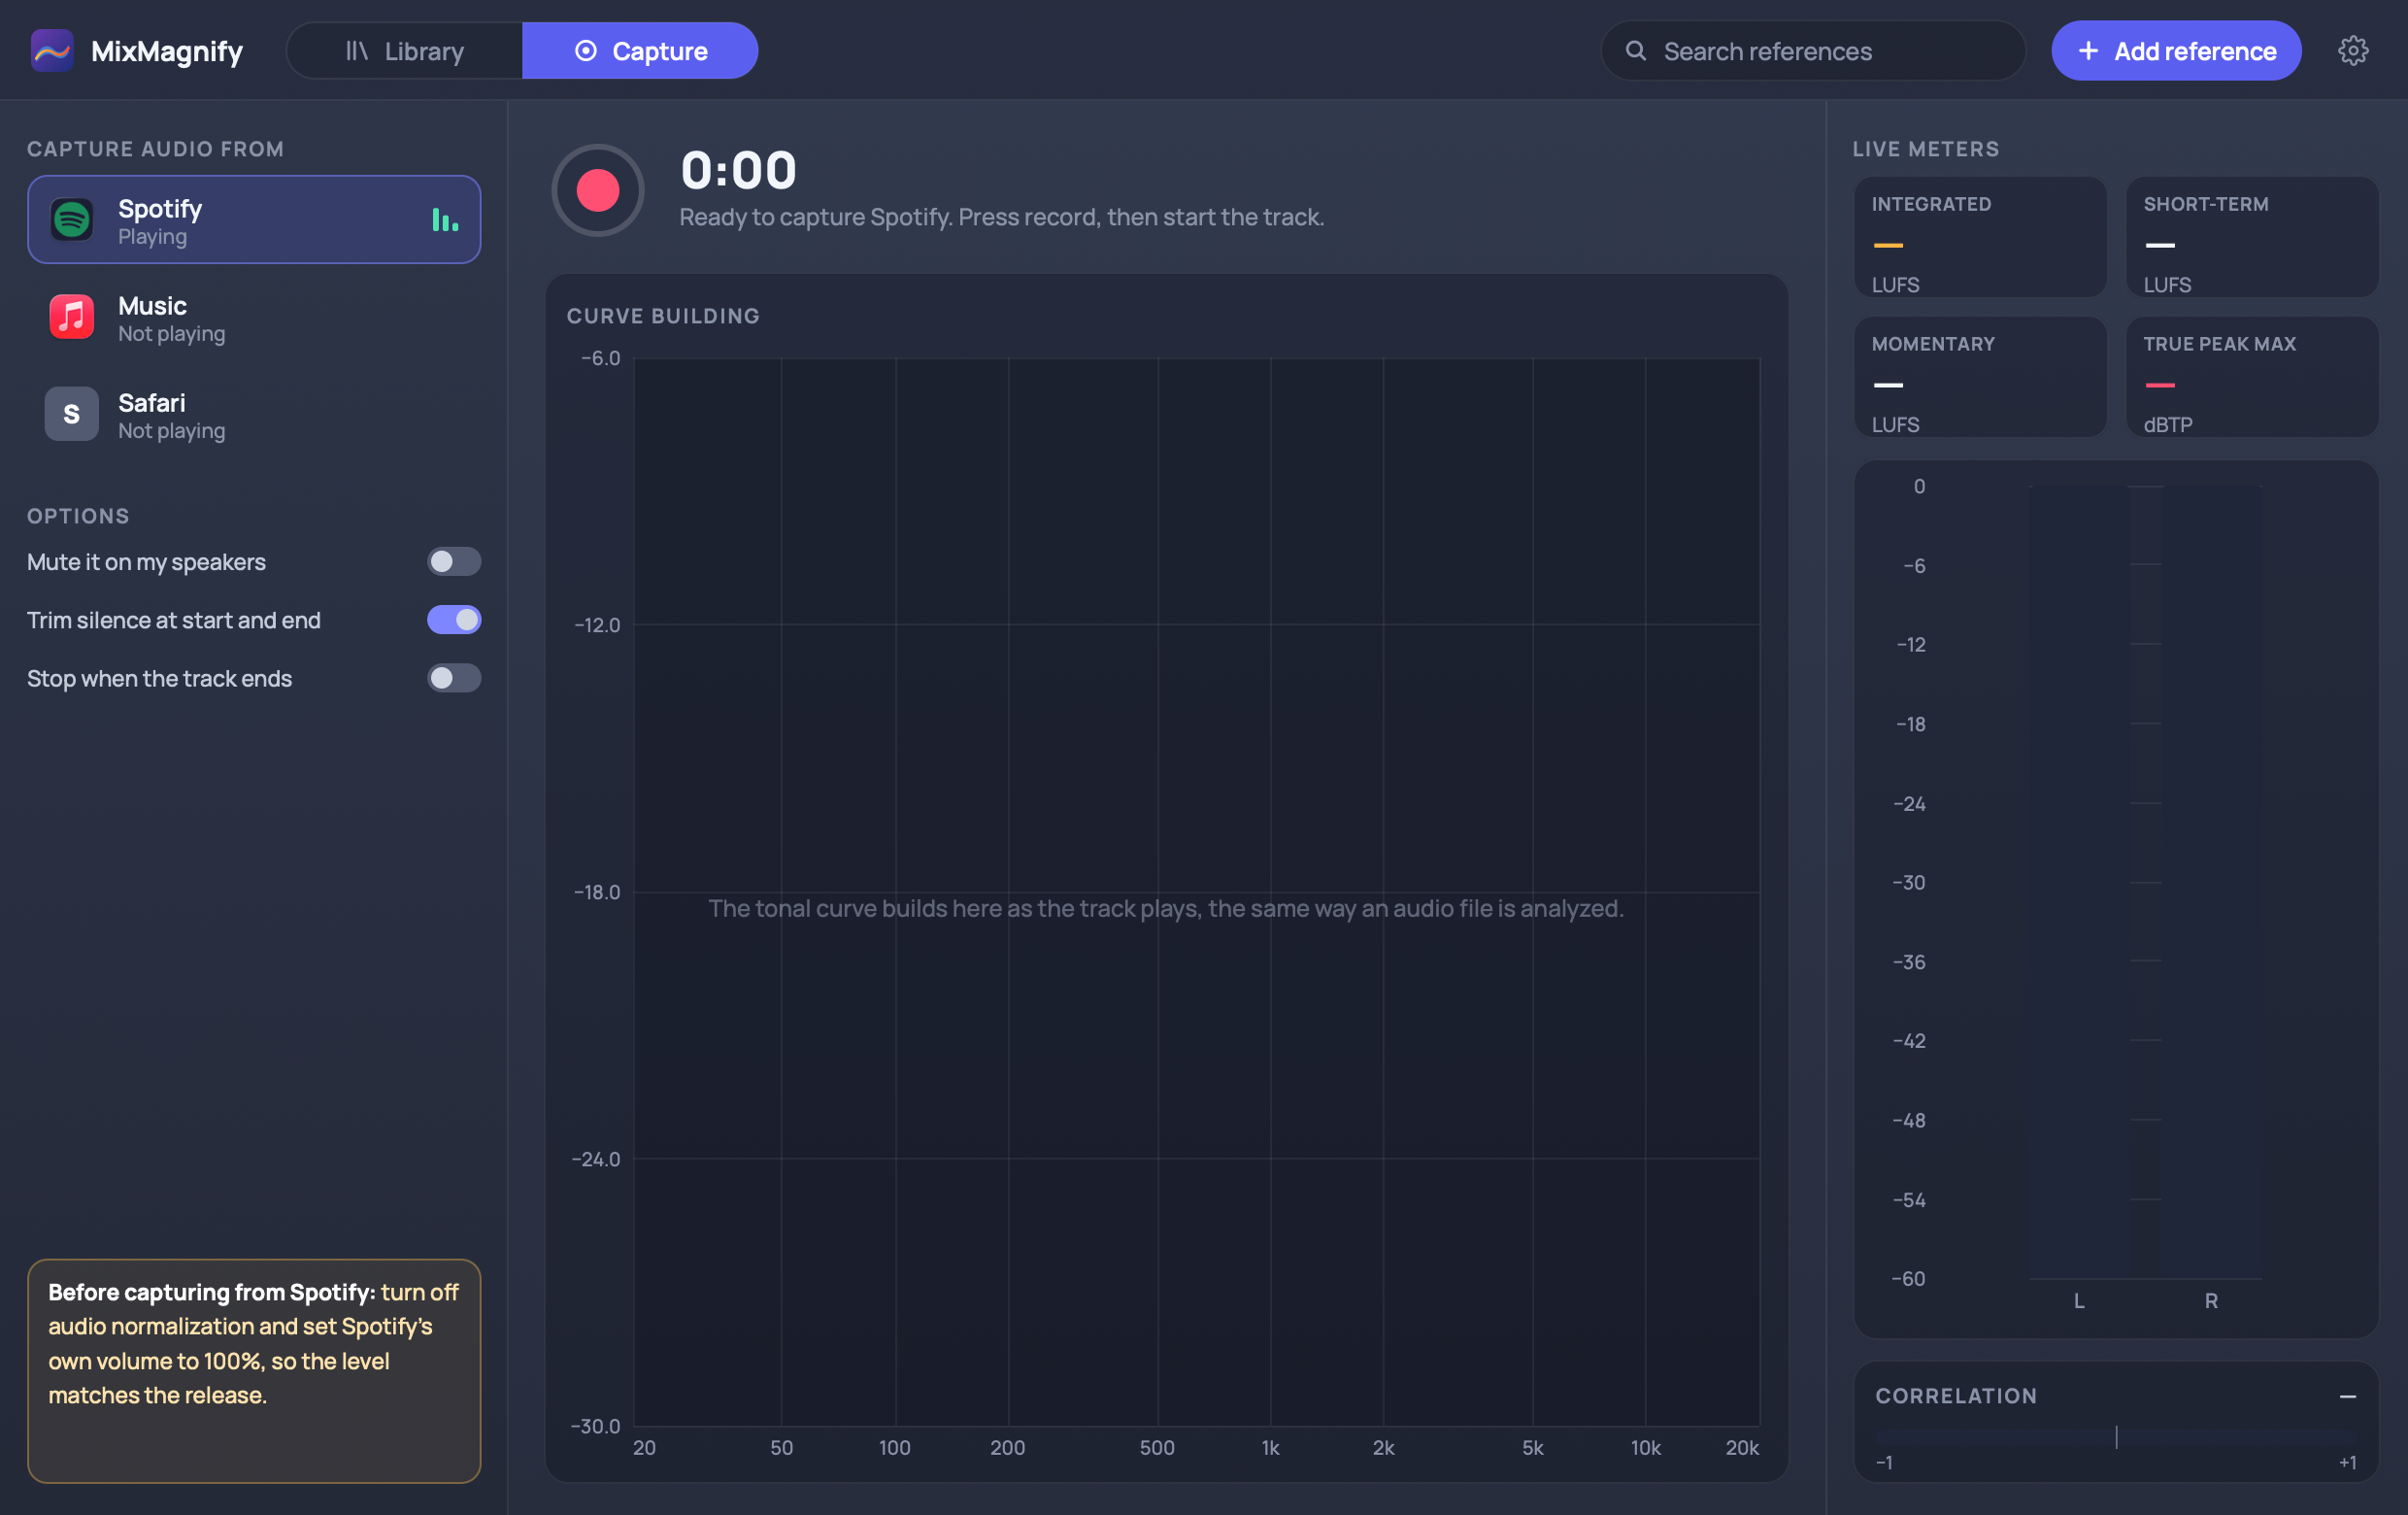
- Click Capture at the top left, or Add reference > Capture from an app….
- Under Capture audio from, pick the app that will play the track. Apps that are playing show as Playing.
- Click Start capture. If Trim silence is on, MixMagnify waits for sound (Waiting for sound), so you can press record first and then start the track.
- Play the track from the start. The live meters and the tonal curve build as it plays, the same way an audio file is analyzed.
- Click Stop capture at the end of the track (or let it stop by itself, see below).
- The New reference sheet opens with the analysis done. The name is filled in from the track playing in Spotify or Music when MixMagnify can read it. Click Save reference, or Discard.
Options
- Mute it on my speakers: you don't hear the app while it's being captured. Handy when you want to keep working on something else.
- Trim silence at start and end (on by default): leaves out the silence before the track starts and after it ends. The threshold is in the app's Settings.
- Stop when the track ends: For Apple Music and Spotify captures, MixMagnify will auto-detect when the song ends and stop the capture. For other sources, the capture stops by itself after 5 seconds of silence. A short pause inside a track doesn't stop it.
The capture also stops by itself if the app quits, if your audio output device or its sample rate changes, or if the disk is full.
MixMagnify never keeps the audio it captures. It saves only the analysis: the curve, the loudness and level statistics, and the loudness over time. Because there's no audio, a captured reference can't be played in the plugin's AB listen bar. You can still compare against its curve and meters as usual.
Streaming services turn tracks up or down to their own loudness target, and some apply their own processing. For the most faithful reference, turn off volume normalization (and any EQ or spatial audio) in the app you're capturing from, and set the source app's volume to maximum.
Permission
The first time you capture, your computer will ask you to allow MixMagnify to record system audio. If you said no, the Capture screen shows how to enable it in your system's privacy settings. Enable it there, then start the capture again.
App settings
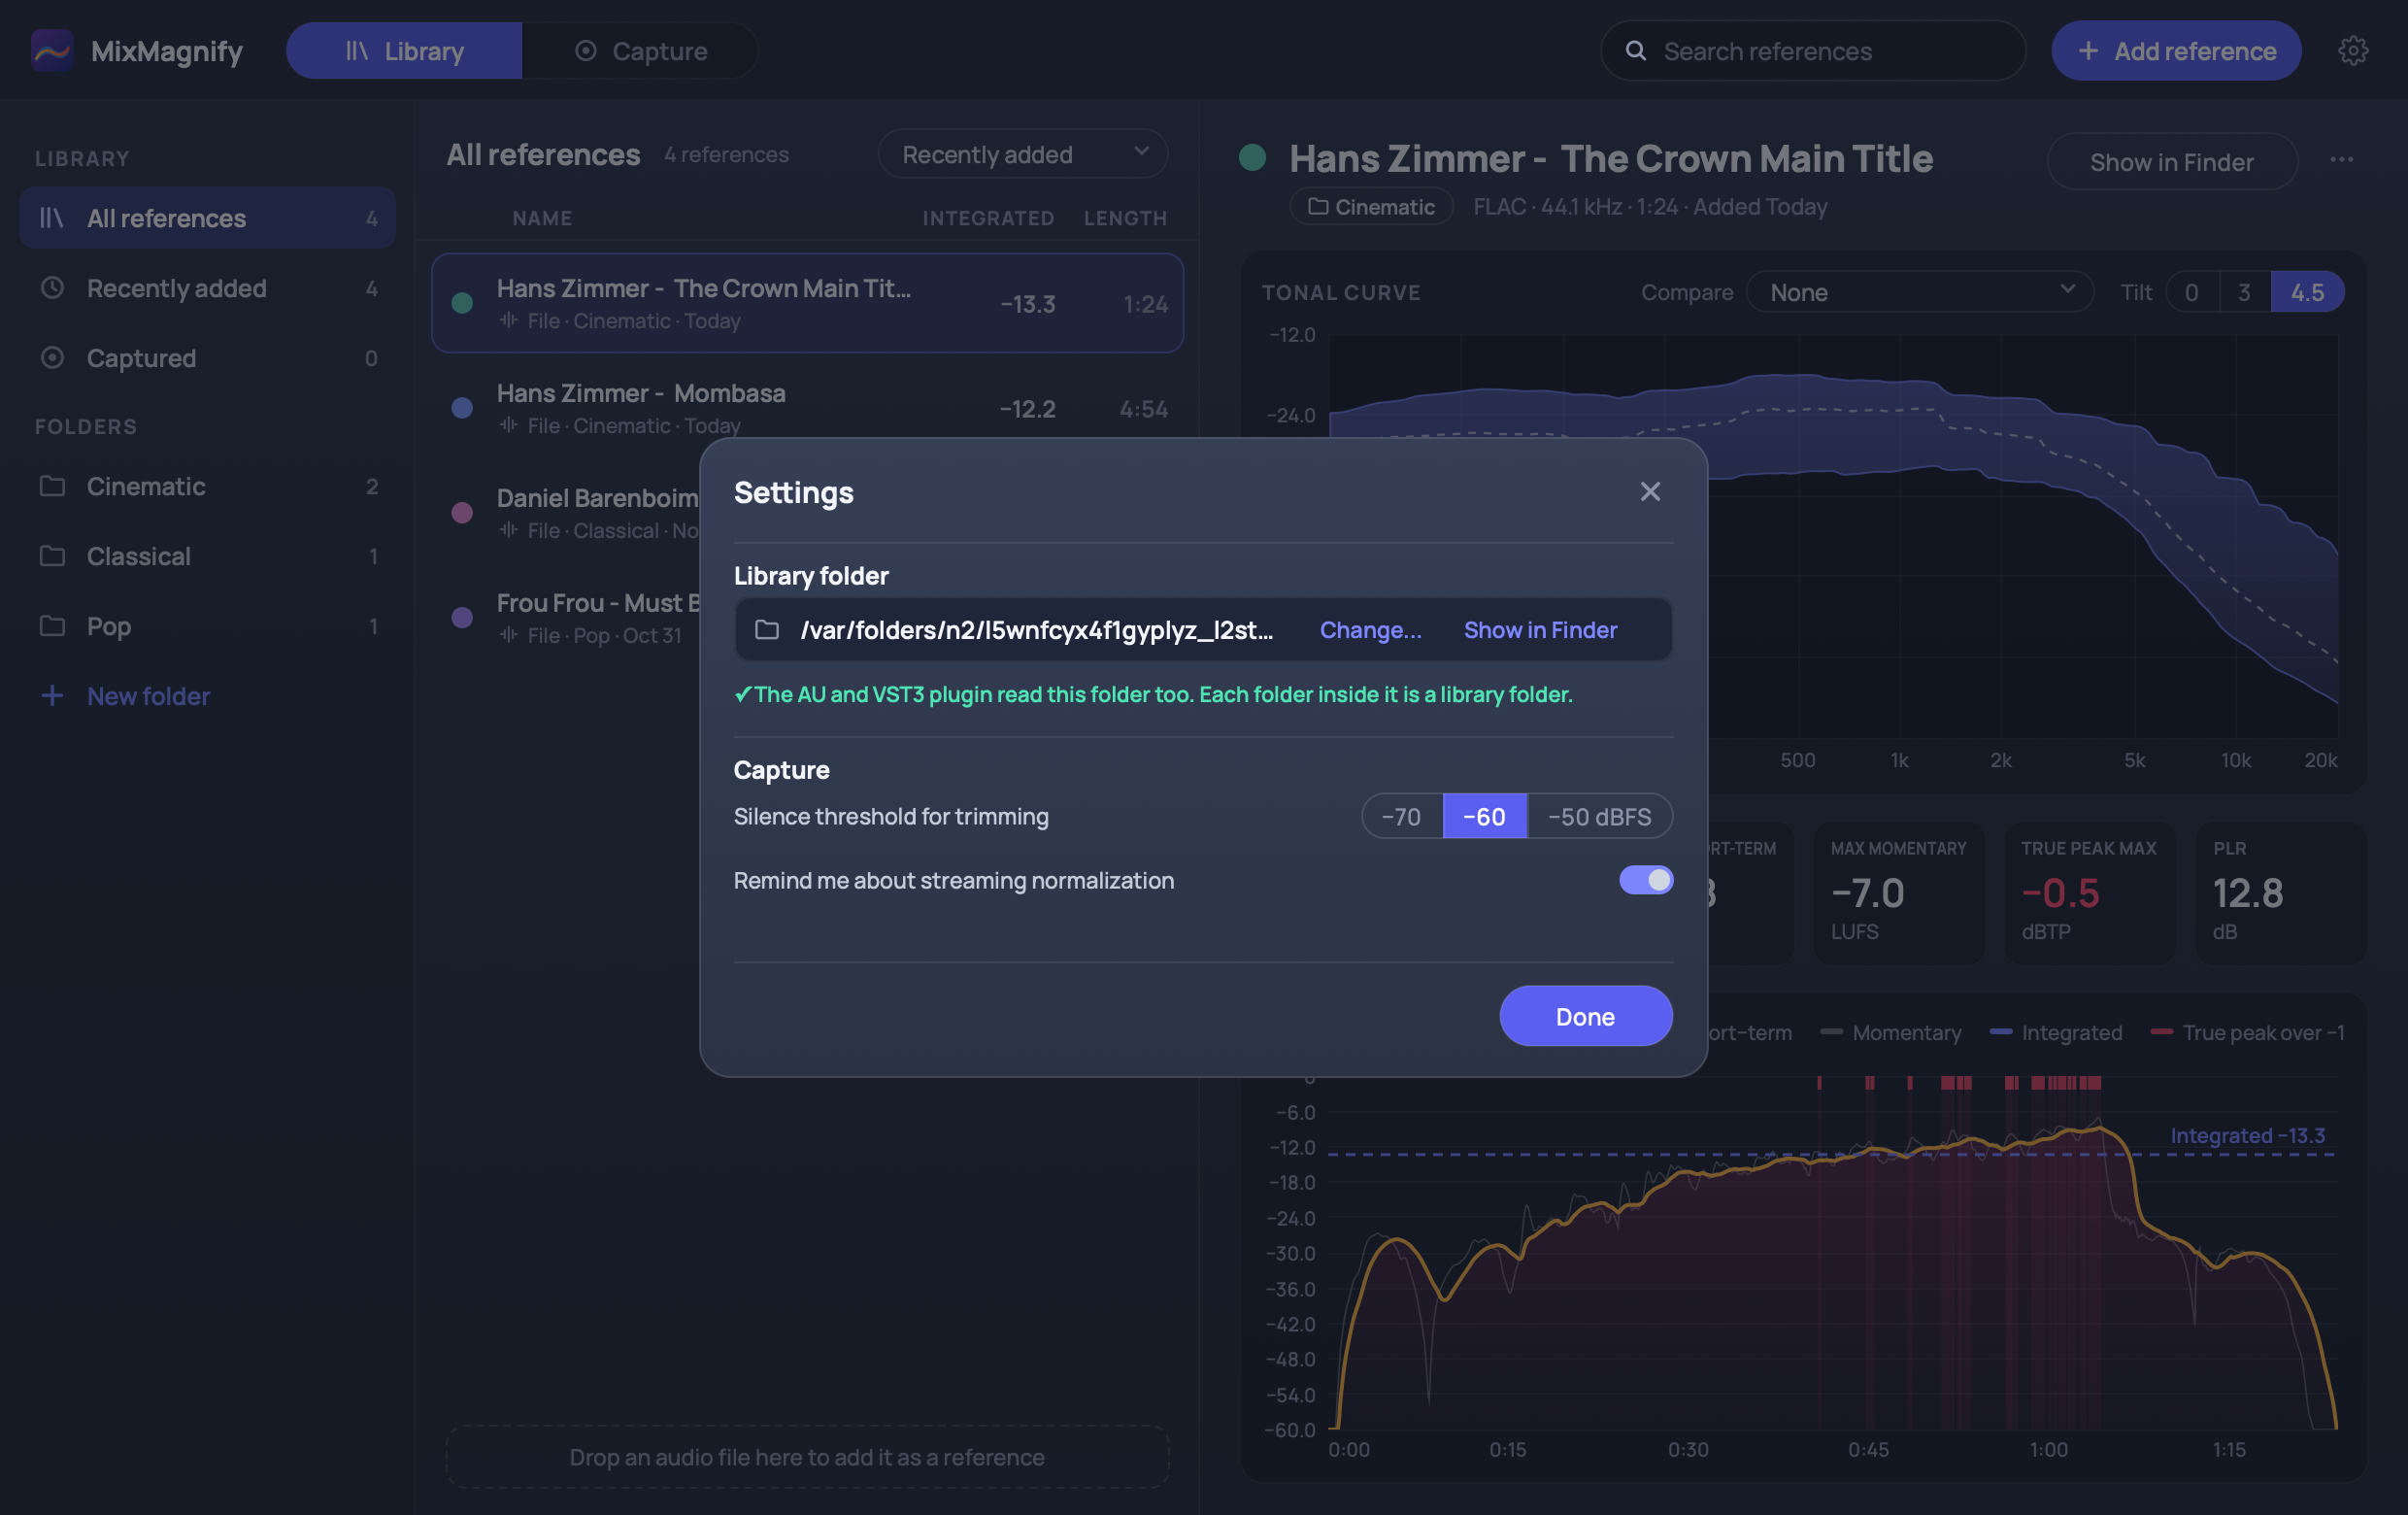
Click the cog to choose the Library folder (shared with the plugin) and the Silence threshold for trimming used by Capture.
Common Questions
My mix curve is flat or empty. MixMagnify only measures what's playing through it. Check that it's on your main output and that your transport is playing. The curve needs a few seconds of audio to build.
My mix is louder than the reference, but the curves sit on top of each other. That's expected. Curves are matched to their own loudness so only the balance is compared. Use the Integrated readout to compare loudness.
The AB listen bar says B can't play. Either the reference's audio file has moved (click Locate file…) or the reference was captured in the standalone app, which keeps no audio.
A reference I added in the app doesn't show in the plugin. Check that both use the same library folder in Settings. Changes show within about 2 seconds.
Overload Protection tripped and I hear nothing. Click Reset on the Protection pill. If it trips again straight away, find what's sending the overload, or raise the limit in Settings. By default, MixMagnify is set to a 1ms lookahead with a 0 dbfs threshold. This protects against a variety of noise bursts, but may be overly conservative for your needs.
I deleted a reference by mistake. Delete moves the curve file to the Trash, so you can put it back from there.
I don't see the meters moving in Studio One. Try lowering your overload protection in Studio One's audio engine settings.